# Welcome to TicketLog

TicketLog provides a public-facing web portal for creating tickets in Azure DevOps.

New tickets are added directly to your nominated DevOps Project. TicketLog users receive email notifications when comments are added via the Azure DevOps site. Users can respond with their own comments via the TicketLog portal.

TicketLog users must register an account before they can interact with tickets. As a Service Desk Admin, you have the option to make your Service Desk public to everyone, or restricted to invited users only.

<figure><img src="https://2014854803-files.gitbook.io/~/files/v0/b/gitbook-x-prod.appspot.com/o/spaces%2FxDo3MABoirR9g57aZyJ1%2Fuploads%2FMVuXTtrkRUZaNxjDFsH6%2Fimage.png?alt=media&amp;token=ef9cc4fa-946f-49d3-8b95-c151665ee72a" alt=""><figcaption></figcaption></figure>


# Users guide

A guide for end-users of TicketLog

## Create an account

From the custom domain “demo.ticket-log.com” a user sees the Welcome screen. In this screenshot, the user is currently not signed in:

<figure><img src="https://2014854803-files.gitbook.io/~/files/v0/b/gitbook-x-prod.appspot.com/o/spaces%2FxDo3MABoirR9g57aZyJ1%2Fuploads%2F0LaHLvrc3CDKrgttxxEn%2Fimage.png?alt=media&amp;token=e6e28f3b-b758-4954-ac70-932f2f69c04d" alt="" width="563"><figcaption></figcaption></figure>

The user clicks “Sign Up” to create a new login:

<figure><img src="https://2014854803-files.gitbook.io/~/files/v0/b/gitbook-x-prod.appspot.com/o/spaces%2FxDo3MABoirR9g57aZyJ1%2Fuploads%2FYj8Ee9Uz4hRvVgOLEO7v%2Fimage.png?alt=media&amp;token=735cdbbf-f300-4a32-bc92-d9503ab69486" alt="" width="563"><figcaption></figcaption></figure>

Email verification is required. The user must enter a valid email address and click “Send verification code”. A verification email will be sent to this address with a verification code:

<figure><img src="https://2014854803-files.gitbook.io/~/files/v0/b/gitbook-x-prod.appspot.com/o/spaces%2FxDo3MABoirR9g57aZyJ1%2Fuploads%2F6tgabLz7cUPy6KHuu6Ug%2Fimage.png?alt=media&amp;token=7a7127fd-c66f-4617-befe-ed087534a42f" alt="" width="418"><figcaption></figcaption></figure>

The user can now complete the Sign Up form.

## Create a new ticket

Once signed in, the Welcome screen will now list all the user’s tickets.

In this screenshot, no tickets have been created by this user, so the list is empty:

<figure><img src="https://2014854803-files.gitbook.io/~/files/v0/b/gitbook-x-prod.appspot.com/o/spaces%2FxDo3MABoirR9g57aZyJ1%2Fuploads%2F4GjDveATCpObbPYSNEpy%2Fimage.png?alt=media&amp;token=4428dbae-3a21-40b3-992a-2a2fb94ec130" alt="" width="563"><figcaption></figcaption></figure>

The user clicks “New Ticket” and is presented the New Ticket screen.

In this example, the Description is pre-filled with a simple template:

<figure><img src="https://2014854803-files.gitbook.io/~/files/v0/b/gitbook-x-prod.appspot.com/o/spaces%2FxDo3MABoirR9g57aZyJ1%2Fuploads%2F0NONX9nQ29kOZG11Qd4f%2Fimage.png?alt=media&amp;token=9e92dab2-cc92-455a-a320-15a0c107329d" alt="" width="563"><figcaption></figcaption></figure>

The user can now complete the new ticket’s details.

In this screenshot, the user has added rich text, an image, and a file attachment:

<figure><img src="https://2014854803-files.gitbook.io/~/files/v0/b/gitbook-x-prod.appspot.com/o/spaces%2FxDo3MABoirR9g57aZyJ1%2Fuploads%2Fl7wYTM7NOKTyKUPMXyx2%2Fimage.png?alt=media&amp;token=1295e635-1686-480e-a513-6b6d2b6c4d6b" alt="" width="563"><figcaption></figcaption></figure>

The Welcome screen now lists the user’s new ticket:

<figure><img src="https://2014854803-files.gitbook.io/~/files/v0/b/gitbook-x-prod.appspot.com/o/spaces%2FxDo3MABoirR9g57aZyJ1%2Fuploads%2FdCHfg1mDoXhGMnkkFH9K%2Fimage.png?alt=media&amp;token=3c7fdc9c-1c20-459f-8e16-ab43e697ba9e" alt="" width="563"><figcaption></figcaption></figure>

## Add comments

Opening the ticket shows the ticket details, status, and allows new comments to be added:

<figure><img src="https://2014854803-files.gitbook.io/~/files/v0/b/gitbook-x-prod.appspot.com/o/spaces%2FxDo3MABoirR9g57aZyJ1%2Fuploads%2FgN51Yl2GKMMdPwdjjoeD%2Fimage.png?alt=media&amp;token=c40dbe27-f16a-4a8d-b7de-a21cd52f6498" alt="" width="563"><figcaption></figcaption></figure>

In Azure DevOps, the ticket’s Work Item is viewable by Azure DevOps users:

<figure><img src="https://2014854803-files.gitbook.io/~/files/v0/b/gitbook-x-prod.appspot.com/o/spaces%2FxDo3MABoirR9g57aZyJ1%2Fuploads%2FU8wcY9vLql3zLBO4suzC%2Fimage.png?alt=media&amp;token=23600685-9f15-4598-b7ff-268c79f46424" alt="" width="563"><figcaption></figcaption></figure>

<figure><img src="https://2014854803-files.gitbook.io/~/files/v0/b/gitbook-x-prod.appspot.com/o/spaces%2FxDo3MABoirR9g57aZyJ1%2Fuploads%2FpHxB9RkyFUWMH8kH17sF%2Fimage.png?alt=media&amp;token=637311a4-ff7f-43ab-ae16-298dbc7cf6ed" alt="" width="563"><figcaption></figcaption></figure>

Comments can be added to the Azure DevOps Work Item:

<figure><img src="https://2014854803-files.gitbook.io/~/files/v0/b/gitbook-x-prod.appspot.com/o/spaces%2FxDo3MABoirR9g57aZyJ1%2Fuploads%2F58nomVpZQkrh4rcRdOkp%2Fimage.png?alt=media&amp;token=62e3ef32-68f0-4902-a282-7d5695aca79f" alt="" width="563"><figcaption></figcaption></figure>

The user who created the ticket is notified by email:

<figure><img src="https://2014854803-files.gitbook.io/~/files/v0/b/gitbook-x-prod.appspot.com/o/spaces%2FxDo3MABoirR9g57aZyJ1%2Fuploads%2FxhbRiv4N9XiQjJf1L2Us%2Fimage.png?alt=media&amp;token=e3db69d5-ea8e-46ac-83ad-1d18aa1f56b0" alt="" width="416"><figcaption></figcaption></figure>

The user can see added comments in the ticket:

<figure><img src="https://2014854803-files.gitbook.io/~/files/v0/b/gitbook-x-prod.appspot.com/o/spaces%2FxDo3MABoirR9g57aZyJ1%2Fuploads%2FRbbMLfitO3NWV4rSIJwj%2Fimage.png?alt=media&amp;token=47c80e8e-ac83-432e-97dc-72f8f347b3eb" alt="" width="563"><figcaption></figcaption></figure>

## Share this ticket <a href="#share-this-ticket" id="share-this-ticket"></a>

When viewing a ticket, users now have the ability to 'Share this ticket'. This option is available in the top-right ticket menu:

<figure><img src="https://2014854803-files.gitbook.io/~/files/v0/b/gitbook-x-prod.appspot.com/o/spaces%2FxDo3MABoirR9g57aZyJ1%2Fuploads%2FVuhF4PHEcT3IRpR8ByAp%2Fimage.png?alt=media&amp;token=fdb93d42-c2b6-443f-81ca-3d1e0cd5a435" alt="" width="197"><figcaption></figcaption></figure>

From this screen users have two methods to share a ticket with another user: 'Share by email' and 'Share by link'.

<figure><img src="https://2014854803-files.gitbook.io/~/files/v0/b/gitbook-x-prod.appspot.com/o/spaces%2FxDo3MABoirR9g57aZyJ1%2Fuploads%2FzJeQNXzFqAm3UOleo3bZ%2Fimage.png?alt=media&amp;token=63acdd67-acef-413c-963f-fc0a21be75fd" alt="" width="563"><figcaption></figcaption></figure>

### Share by email <a href="#share-by-email" id="share-by-email"></a>

Choose this option to send a ticket link to a specified email address. Enter the email address and click 'Send email'. The recipient will receive an email with a link to the ticket. The recipient will be added to the ticket as a watcher. However, if the recipient is not a member of the service desk, they will not receive notification emails until they are.

### Share by link <a href="#share-by-link" id="share-by-link"></a>

Click 'Copy link' to copy a ticket link to the clipboard. You can then paste the link to another application. For example, you might paste this into a chat application or email.


# Moderators guide

A guide for TicketLog Moderators

Users with Moderator permission level have access to the Show All Tickets screen.

From this screen a Moderator can view and open all tickets, search for tickets with specific text, or filter tickets by ticket state.
<figure><img src="https://2014854803-files.gitbook.io/~/files/v0/b/gitbook-x-prod.appspot.com/o/spaces%2FxDo3MABoirR9g57aZyJ1%2Fuploads%2FkFyw1Kj9Y2KQMdUYtETy%2Fimage.png?alt=media&amp;token=31a10b1b-a935-40d0-ba01-6f183de23e56" alt="" width="533"><figcaption></figcaption></figure>

{% hint style="info" %}
The total number of tickets indicated at the end of the list may be higher than the actual number of visible tickets. This occurs when tickets exist in Azure DevOps that cannot be viewed in TicketLog. The most common reason is when tickets are created directly in Azure DevOps.

We apologise for any inconvenience this may cause.
{% endhint %}

Users can reach the Search screen via the Service Desk's configuration menu, by clicking **Show All Tickets**:

<figure><img src="https://2014854803-files.gitbook.io/~/files/v0/b/gitbook-x-prod.appspot.com/o/spaces%2FxDo3MABoirR9g57aZyJ1%2Fuploads%2F6T20JziPvyhKjsnaSJm5%2Fimage.png?alt=media&amp;token=5743a481-99a3-4cc7-a0bb-bc89d5608209" alt="" width="563"><figcaption></figcaption></figure>

**Note:** Please be aware that ticket data is fetched directly from the connected Azure DevOps service. Searching for text or selecting 'Show All' may take a long time to process if your service desk has a large volume of tickets.

## Show watchers <a href="#show-watchers" id="show-watchers"></a>

When viewing a ticket, Moderators and Administrators now have the ability to 'Show watchers':

<figure><img src="https://2014854803-files.gitbook.io/~/files/v0/b/gitbook-x-prod.appspot.com/o/spaces%2FxDo3MABoirR9g57aZyJ1%2Fuploads%2FYQRbUNCbhMccDuxhXcYe%2Fimage.png?alt=media&amp;token=d74ea60d-a366-47d6-87e7-c0dd3f290683" alt="" width="197"><figcaption></figcaption></figure>

From this screen you can see all users who are watchers of the ticket. Watchers are users who will receive a notification when changes to the ticket are made in Azure DevOps, such as a new comment or change in status.

<figure><img src="https://2014854803-files.gitbook.io/~/files/v0/b/gitbook-x-prod.appspot.com/o/spaces%2FxDo3MABoirR9g57aZyJ1%2Fuploads%2FmRgWdMY0gwvGEC5swgIg%2Fimage.png?alt=media&amp;token=2dfb4144-98f5-49de-b3bc-c27a066ce6c6" alt="" width="563"><figcaption></figcaption></figure>


# Administrators guide

A guide for TicketLog Administrators

Administrators can view all the service desk settings screens.

Settings can be reached via the user's service desk list screen:

<figure><img src="https://2014854803-files.gitbook.io/~/files/v0/b/gitbook-x-prod.appspot.com/o/spaces%2FxDo3MABoirR9g57aZyJ1%2Fuploads%2FE9aq9lih93ZAIS6gqRET%2Fimage.png?alt=media&amp;token=1aba998e-e745-4c57-b8b9-10fa767e8ca1" alt="" width="563"><figcaption></figcaption></figure>

Or via the service desk's configuration menu and clicking **Settings**:<br>

<figure><img src="https://2014854803-files.gitbook.io/~/files/v0/b/gitbook-x-prod.appspot.com/o/spaces%2FxDo3MABoirR9g57aZyJ1%2Fuploads%2FlZcAEluijuREByXmtzFm%2Fimage.png?alt=media&amp;token=f8b2779e-ad3c-448b-9587-ad315ff6e670" alt="" width="563"><figcaption></figcaption></figure>


# Service desk settings

When you first open the service desk settings you will face the general Service Desk settings screen:

<figure><img src="https://2014854803-files.gitbook.io/~/files/v0/b/gitbook-x-prod.appspot.com/o/spaces%2FxDo3MABoirR9g57aZyJ1%2Fuploads%2FCLti3Qu6l1ICXLVlYrfQ%2Fimage.png?alt=media&amp;token=50710175-91a2-4109-94dc-d14ea0f947b2" alt="" width="563"><figcaption></figcaption></figure>

At the top is vital information about your service desk:

* **Tier** indicates if the service desk is in Free or Pro mode. Click the button to the right to upgrade or downgrade this desk.

{% hint style="info" %}
**Note:** once you have purchased a Pro subscription, you must assign your subscription to a service desk by clicking the 'Upgrade to PRO' button that will appear here.
{% endhint %}

* **Created** indicates when the service desk was created.
* **Users** indicates the total number of active users, and maximum number of permitted users.
* **Tickets** indicates the total number of tickets created in this service desk.

From this screen you can edit:

* **Service desk name**
* **Introductory text** that appears on the service desk home page.
  * The **Introduction is public** option determines if the *introductory text* appears to visitors who are not signed in or do not have permission to use your service desk.&#x20;
* **Timezone** used for all timestamps associated with your service desk tickets.

You can also enable or disable the service desk or delete the service desk from this page.


# User settings

This is the User configuration screen:

<figure><img src="https://2014854803-files.gitbook.io/~/files/v0/b/gitbook-x-prod.appspot.com/o/spaces%2FxDo3MABoirR9g57aZyJ1%2Fuploads%2FQn7AB0VDP8UrEBa6Wcie%2Fimage.png?alt=media&amp;token=20aab117-8888-48bf-8a60-a2ce8feb4112" alt="" width="500"><figcaption></figcaption></figure>

From this screen you can:

* Add and remove users
* Resend invitation emails
* Change a user's permission level
* See when each user was last active on the TicketLog platform.
* Select if users must be invited or able to self-signup to the service desk themselves
* Specify Accepted Domains, which restrict new users to an email address that belongs to one of the specified domains.
* Select if Moderators can click the 'Open in Azure DevOps button', which is helpful if your moderators have their own Azure DevOps accounts.

{% hint style="info" %}
The maximum number of permitted users depends upon your TicketLog tier. Exceeding the limit will disable your service desk.
{% endhint %}

## **Single Sign On (SSO) with Entra ID**

TicketLog recently added support for Single Sign On (SSO) with Entra ID.

For information, please refer to: [2025.05.21: Single Sign On (SSO)](/release-notes/2025.05.21-single-sign-on-sso)

SSO is only available on the TicketLog Pro tier. To enable SSO on your service desk, please contact [TicketLog Support](https://ticket-log.com/Contact).

## **Add a user**

* Click 'Add User' button
* Enter email address and select a permission level in the following form:

<figure><img src="https://2014854803-files.gitbook.io/~/files/v0/b/gitbook-x-prod.appspot.com/o/spaces%2FxDo3MABoirR9g57aZyJ1%2Fuploads%2FEWLu0uDizeMaoKTDTIlu%2Fimage.png?alt=media&amp;token=70423c62-0434-41b0-aec5-ec89ac3b4d8d" alt="" width="375"><figcaption></figcaption></figure>

* **Optional:** select whether an invitation email should be sent to the new user
* Click 'Add user' to add user to the service desk

{% hint style="info" %}
The new user's email address must comply with the **Accepted Domains** setting if it has been applied.
{% endhint %}

## Remove a user

* Click the drop down arrow next to the user and select 'Remove user'
* In the popup window, click 'Remove user' to confirm removal of the user

{% hint style="info" %}
You cannot remove yourself from a service desk.
{% endhint %}

## Change permission level

* Click the drop-down arrow next to the user and select 'Change permissions'
* In the popup window, select the new permission level:

<figure><img src="https://2014854803-files.gitbook.io/~/files/v0/b/gitbook-x-prod.appspot.com/o/spaces%2FxDo3MABoirR9g57aZyJ1%2Fuploads%2FcI7N38mDDWX9QaX3VYbP%2Fimage.png?alt=media&amp;token=bae1b9e6-130f-4415-9062-ecabb6011582" alt="" width="375"><figcaption></figcaption></figure>

* Click 'Save changes' to confirm the change

{% hint style="info" %}
You cannot remove or change permission level of the Owner of a PRO Service Desk
{% endhint %}


# Azure DevOps settings

This is the Azure DevOps configuration screen:

<figure><img src="https://2014854803-files.gitbook.io/~/files/v0/b/gitbook-x-prod.appspot.com/o/spaces%2FxDo3MABoirR9g57aZyJ1%2Fuploads%2Fcdgw3bZJGsfZkKrP0Kca%2Fimage.png?alt=media&amp;token=1a55c770-da9d-45f0-a792-af394933c85f" alt="" width="563"><figcaption></figcaption></figure>

From this screen you set the **Organization URL** and **Project** name for the Azure DevOps organization and project you want new tickets to be created in. Additional Azure DevOps settings (such as work item types, tags and areas) are located in [Forms & fields](/documentation/administrators-guide/forms-and-fields) settings.

Select an **Authentication method** then click **Save & Authorize** to complete the integration. What happens next depends on the authentication method selected:

{% hint style="info" %}
With either method, you should consider using a dedicated user for the purpose of TicketLog integration. This will ensure all interactions (such as comments and updates) are easy to identify in Azure DevOps.
{% endhint %}

{% hint style="info" %}
For details on authorization requirements or help with issues, check out our Troubleshooting guide here:[Authorizing Azure DevOps](/troubleshooting/authorizing-azure-devops)
{% endhint %}

* **Microsoft Entra ID:**

  * *Choose this method if your Azure DevOps users are Entra ID organizational users.*
  * Select a currently logged in user or sign in with your preferred user.
  * Accept the integration with TicketLog:

  <figure><img src="https://2014854803-files.gitbook.io/~/files/v0/b/gitbook-x-prod.appspot.com/o/spaces%2FxDo3MABoirR9g57aZyJ1%2Fuploads%2FMY8s1H6BJxvBJaoLzZCz%2Fimage.png?alt=media&amp;token=ae4fc3a7-fbb0-4155-baca-6fe63f8a66f2" alt="" width="344"><figcaption></figcaption></figure>
* **Legacy Azure DevOps OAuth:**

  * *Choose this method if your Azure DevOps users are direct Microsoft logins.*
  * *Please note:*
    * Visit our [Quick Setup guide](/guides/how-to-connect-to-azure-devops) for detailed instructions on this method.
    * This method does not give an option to select or change user. Authentication will default to the currently logged-in Azure DevOps user. For this reason, we recommend completing this process while *not* logged in to Azure DevOps (consider using a Guest, Private or Incognito browser). This way, you can be sure which Azure DevOps user is attached as the integration user to TicketLog.&#x20;
  * If you are not already logged in to Azure DevOps, you will be prompted to login.
  * You will then be prompted to accept data sharing for integration. Verify the user (1) and organization (2) details are correct, then click Accept.

  <figure><img src="https://2014854803-files.gitbook.io/~/files/v0/b/gitbook-x-prod.appspot.com/o/spaces%2FxDo3MABoirR9g57aZyJ1%2Fuploads%2FayNj3vjt30qA619yEcUV%2Fimage.png?alt=media&amp;token=47bf631b-780a-4b11-8497-a39f4f167431" alt="" width="563"><figcaption></figcaption></figure>

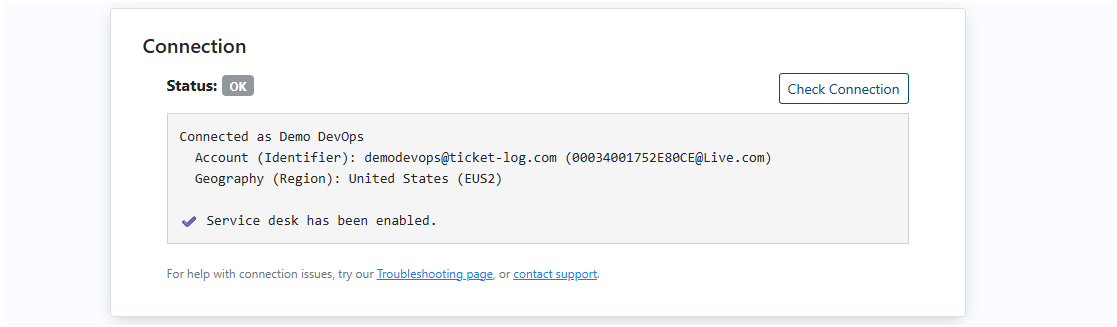
Once accepted, TicketLog will attempt to validate the connection with Azure DevOps and ensure minimum configuration requirements are correct. Watch the panel at the bottom of the screen and wait for the results to appear. If validation is successful, the service desk will be enabled. If there is an error, the service desk will be disabled.

<figure><img src="https://2014854803-files.gitbook.io/~/files/v0/b/gitbook-x-prod.appspot.com/o/spaces%2FxDo3MABoirR9g57aZyJ1%2Fuploads%2F7hv9GxdYAwD0js5BngdX%2Fimage.png?alt=media&amp;token=fda6429d-f85d-47b8-9a23-de5bf19b0d44" alt="" width="563"><figcaption></figcaption></figure>

You can validate the connection any time by clicking the **Check Connection** button.

&#x20;


# Forms & fields

With **forms**, you can prompt users to choose from multiple submission forms for new tickets, with each form having different settings, custom fields and Azure DevOps configuration.

<figure><img src="https://2014854803-files.gitbook.io/~/files/v0/b/gitbook-x-prod.appspot.com/o/spaces%2FxDo3MABoirR9g57aZyJ1%2Fuploads%2Fg2u7hSTZFc331Wnpt6ei%2Fimage.png?alt=media&amp;token=a35dfdcd-544e-404d-ba17-037cd7ab784b" alt=""><figcaption></figcaption></figure>

Configuration of forms is managed via the Forms & Fields settings screen:

<figure><img src="https://2014854803-files.gitbook.io/~/files/v0/b/gitbook-x-prod.appspot.com/o/spaces%2FxDo3MABoirR9g57aZyJ1%2Fuploads%2FNPmjy6FlJRjbAsxQhQ7O%2Fimage.png?alt=media&amp;token=46764bb3-3d95-4d40-b7ae-2a4d356bca87" alt="" width="563"><figcaption></figcaption></figure>

{% hint style="info" %}
If you have an older service desk, you may not have multi-forms enabled (see: [2024.06.10: Multi-forms](/release-notes/2024.06.10-multi-forms) ). If so, you will be taken directly to the **Form settings** page.
{% endhint %}

From this screen you can:

* Add a new form by clicking the 'Add Form' button
* Re-arrange the order of forms by clicking the up and down arrows
* Edit a form by clicking the form's title

The following conditions apply to forms:

* All forms must connect to the same Azure DevOps organization and project.
* You can add and delete forms, but must have at least one form.
* One form must be designated as the **viewing form**. The currently designated viewing form is indicated by the 'View Tickets' label.

## Viewing Forms vs Submission Forms

TicketLog has two types of forms: viewing forms and submission forms.

* **Submission forms** are used to create new tickets. Each submission form can specify its own list of fields.
* A **viewing form** is used to display the contents of a ticket once it has been created, regardless of which submission form was used to create it. A viewing form must therefore include all relevant fields from all submission forms used by the service desk.

Each service desk must have exactly one viewing form, which may or may not also be a submission form.

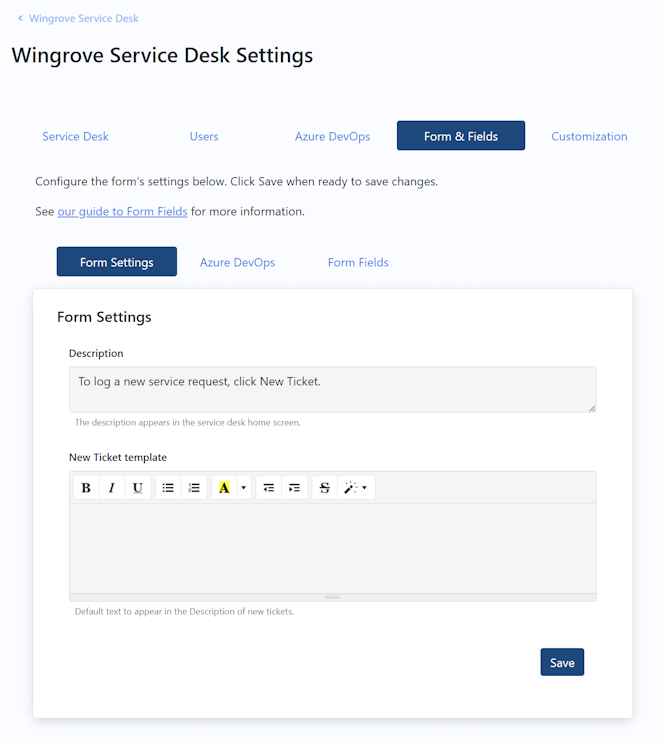
## Form settings

You can specify multiple forms for users to choose from when submitting a new ticket.

Each form can specify these configuration settings:

* Name
* Description
* New ticket template
* Closed states
  * Tickets in a closed state will not allow comments to be added.
  * Specify multiple closed states using a semicolon (;) separated list.
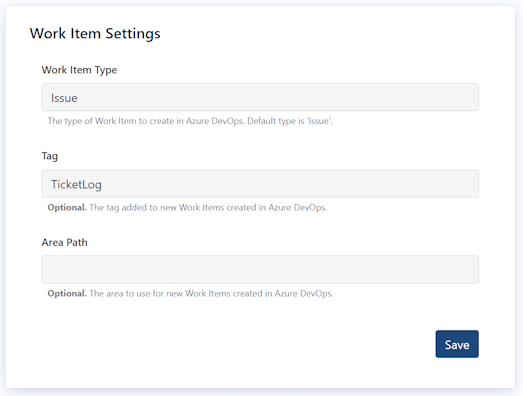
* Azure DevOps work item settings:
  * The **Work Item Type** defaults to 'Issue' but may be set to any other work item type used by the Project.
  * The **Tag** will be added to all tickets created via TicketLog and defaults to 'TicketLog'
  * The **Area Path** can be set for new tickets. It defaults to empty.
* Form fields

To edit a form's settings, select the form from the list. From this screen you can edit settings of a single form:

<figure><img src="https://2014854803-files.gitbook.io/~/files/v0/b/gitbook-x-prod.appspot.com/o/spaces%2FxDo3MABoirR9g57aZyJ1%2Fuploads%2FnixPAK26fsnvJMrxxvn7%2FTLimage.png?alt=media&amp;token=012d16a2-dd19-4e2e-9b0a-c69df28798fc" alt="" width="563"><figcaption><p>Form settings page for general options</p></figcaption></figure>

<figure><img src="https://2014854803-files.gitbook.io/~/files/v0/b/gitbook-x-prod.appspot.com/o/spaces%2FxDo3MABoirR9g57aZyJ1%2Fuploads%2FNapRICzk60U51cttaiOs%2Fimage.png?alt=media&amp;token=ff112b1a-c16c-4637-b24f-fb59d01900de" alt="" width="563"><figcaption><p>Form settings page for Azure DevOps configuration</p></figcaption></figure>

<figure><img src="https://2014854803-files.gitbook.io/~/files/v0/b/gitbook-x-prod.appspot.com/o/spaces%2FxDo3MABoirR9g57aZyJ1%2Fuploads%2FJXrBfbE1gZGJkEc3Xcxq%2Fimage.png?alt=media&amp;token=2b4500bc-0033-4774-b1b9-29918118aee4" alt="" width="563"><figcaption><p>Form settings page for custom form fields</p></figcaption></figure>

## Form fields

Service desk forms can prompt users with custom fields on new tickets:

<figure><img src="https://2014854803-files.gitbook.io/~/files/v0/b/gitbook-x-prod.appspot.com/o/spaces%2FxDo3MABoirR9g57aZyJ1%2Fuploads%2FU3ciW4rMnaTFIjow6OLd%2Fimage.png?alt=media&amp;token=3343b173-6911-4fae-819b-354876c7b987" alt=""><figcaption></figcaption></figure>

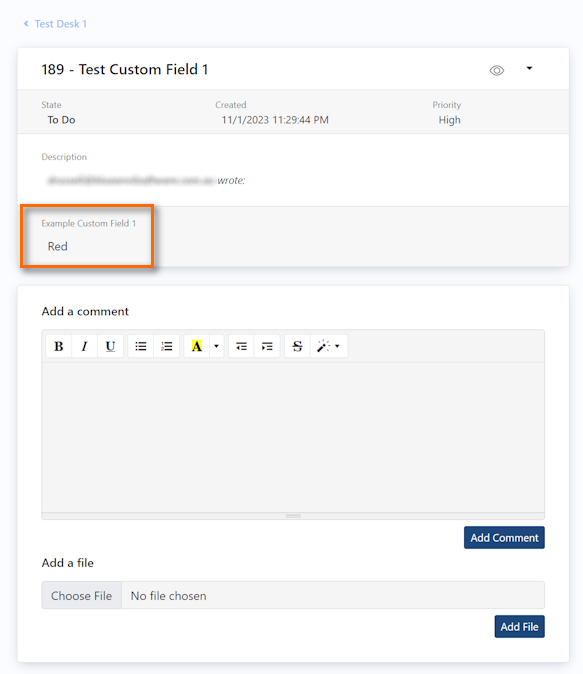
The user's responses to custom field prompts are added to the created Azure DevOps workitems. The field value will appear at the top of the ticket details screen:

<figure><img src="https://2014854803-files.gitbook.io/~/files/v0/b/gitbook-x-prod.appspot.com/o/spaces%2FxDo3MABoirR9g57aZyJ1%2Fuploads%2FaGFZnWKOeCmmunkIkxf4%2Fimage.png?alt=media&amp;token=7e9efe0d-904e-48db-b550-010b39046f9e" alt="" width="437"><figcaption></figcaption></figure>

The field will also appear in the Azure DevOps workitem detail screen:

<figure><img src="https://2014854803-files.gitbook.io/~/files/v0/b/gitbook-x-prod.appspot.com/o/spaces%2FxDo3MABoirR9g57aZyJ1%2Fuploads%2Foizm9uMkEA2IXmCZo13G%2Fimage.png?alt=media&amp;token=e447645d-ef1e-42ac-a16e-4b39527e3717" alt="" width="563"><figcaption></figcaption></figure>

The following conditions apply to form fields:

* Form fields are only available to TicketLog PRO subscribers.
* Form fields must first be created in your Azure DevOps Process Template as custom fields before they are available in TicketLog. See below for instructions.
* The *Identity* custom field type is not supported.

### Add a custom field to Azure DevOps

Only custom fields added to your Azure DevOps process Template are available in TicketLog.

To add a field to your ADO Process Template:&#x20;

1. In Azure DevOps, visit **Organization Settings** > **Process**
2. Find the process used by your project. If not already done, create an Inherited Template and move your project to the inherited template. Only inherited templates can have custom fields.
3. Select the inherited template.
4. Select a work item type. TicketLog defaults to the "Issue" work item type, but other types are supported (see [Authorizing Azure DevOps](/troubleshooting/authorizing-azure-devops)).
5. Click "New field" and complete the details for a new custom field.

<figure><img src="https://2014854803-files.gitbook.io/~/files/v0/b/gitbook-x-prod.appspot.com/o/spaces%2FxDo3MABoirR9g57aZyJ1%2Fuploads%2Few0FNEEsk3En9tX3zHP3%2Fimage.png?alt=media&amp;token=45e5fd53-c143-4540-926a-ea0c9618dc4b" alt="" width="427"><figcaption></figcaption></figure>

### Configure a custom field

To add a custom field to TicketLog, open the **Form Fields** page. Then click **Configure Form Fields**:<br>

<figure><img src="https://2014854803-files.gitbook.io/~/files/v0/b/gitbook-x-prod.appspot.com/o/spaces%2FxDo3MABoirR9g57aZyJ1%2Fuploads%2FbpNMwAVq5KmNBDH4TRRk%2Fimage.png?alt=media&amp;token=9d6a8437-d172-4f98-ae77-233b09f85e8a" alt="" width="563"><figcaption></figcaption></figure>

Wait for the available custom fields to load, select the fields you would like to include, then click **Update**:

<figure><img src="https://2014854803-files.gitbook.io/~/files/v0/b/gitbook-x-prod.appspot.com/o/spaces%2FxDo3MABoirR9g57aZyJ1%2Fuploads%2FYNEXiWoA20N6OYqZ8waA%2Fimage.png?alt=media&amp;token=41b3aa3b-9474-4b00-9e02-a29ce67e9db5" alt="" width="563"><figcaption></figcaption></figure>

You will see the selected fields in the Settings screen:

<figure><img src="https://2014854803-files.gitbook.io/~/files/v0/b/gitbook-x-prod.appspot.com/o/spaces%2FxDo3MABoirR9g57aZyJ1%2Fuploads%2FvrefHJ6DbQzbGVftJMi1%2Fimage.png?alt=media&amp;token=52f3caed-2ad4-4a9e-a909-8803395fd45a" alt=""><figcaption></figcaption></figure>

### Parameter values

You can set a form field's default value to one of the following TicketLog parameters:

* **Ticket URL** - the URL of the ticket once it's created
* **User email** - the email address of the user creating the ticket
* **Username** - the name of the user creating the ticket

{% hint style="info" %}
Only text fields can be set as parameter values. URLs appear as hyperlinks in multi-line text fields only.
{% endhint %}

To do so:

* Expand the menu alongside the field you want to set and select 'Set as Parameter Value':

<figure><img src="https://2014854803-files.gitbook.io/~/files/v0/b/gitbook-x-prod.appspot.com/o/spaces%2FxDo3MABoirR9g57aZyJ1%2Fuploads%2FScx23w6Y88UvGkcA2Rd3%2Fimage.png?alt=media&amp;token=453fc864-52be-41b8-9aac-09ded3cb1b65" alt="" width="563"><figcaption></figcaption></figure>

* Select the paramter value you want to use, and click 'Update':

<figure><img src="https://2014854803-files.gitbook.io/~/files/v0/b/gitbook-x-prod.appspot.com/o/spaces%2FxDo3MABoirR9g57aZyJ1%2Fuploads%2FE2OUltxEXYTfVz4Qk5pi%2Fimage.png?alt=media&amp;token=b4c1fc49-5b21-41a5-969c-e7a5e6a5380b" alt="" width="563"><figcaption></figcaption></figure>

* The form fields will now show the  paramater value to use for that field:

<figure><img src="https://2014854803-files.gitbook.io/~/files/v0/b/gitbook-x-prod.appspot.com/o/spaces%2FxDo3MABoirR9g57aZyJ1%2Fuploads%2FDqsYVs3N4pdPePCKx0NV%2Fimage.png?alt=media&amp;token=9d57f5aa-c514-493a-a81f-e1a3a2409a80" alt="" width="563"><figcaption></figcaption></figure>

* When new tickets are submitted to Azure DevOps, they will have the paramater value set:

<figure><img src="https://2014854803-files.gitbook.io/~/files/v0/b/gitbook-x-prod.appspot.com/o/spaces%2FxDo3MABoirR9g57aZyJ1%2Fuploads%2FPC6xSEY78Ky5xLVYyuEN%2Fimage.png?alt=media&amp;token=b43547d7-93ef-4217-92b3-33762789c691" alt="" width="563"><figcaption></figcaption></figure>


# Customization settings

{% hint style="info" %}
Customization settings are only avilable with the TicketLog PRO tier.
{% endhint %}

This is the Customization settings screen:

<figure><img src="https://2014854803-files.gitbook.io/~/files/v0/b/gitbook-x-prod.appspot.com/o/spaces%2FxDo3MABoirR9g57aZyJ1%2Fuploads%2FYxyUCZVQ5a4kW0k34zZ7%2Fimage.png?alt=media&amp;token=14685dd2-5bef-4867-9cd8-cdb15efba46f" alt="" width="563"><figcaption></figcaption></figure>

Here is an explanation of how each customization option affects the Service Desk:

1. Custom domain name
   * A custom sub-domain on your own domain. Please notify us which domain you want to use. You will need to add DNS records to your domain during setup.
2. Page title
   * The Page title appears in the tab of the user's browser.
3. Navbar title
   * This text appears across the top of each page of your Service Desk. Can be blank.
4. Navbar image URL
   * This URL points to an image used in the top corner of each page of your Service Desk. It replaces the default TicketLog logo. Can be left blank for no logo.
5. Navbar link URL
   * This URL is attached to the Navbar title and Navbar image as a hyperlink. Can be blank.

<figure><img src="https://2014854803-files.gitbook.io/~/files/v0/b/gitbook-x-prod.appspot.com/o/spaces%2FxDo3MABoirR9g57aZyJ1%2Fuploads%2F7Pd0TjUfpHD2cdayZDWD%2Fimage.png?alt=media&amp;token=0ac917c6-f5b7-4288-8a0d-7dc561cbacc7" alt="" width="563"><figcaption></figcaption></figure>


# Custom domain

{% hint style="info" %}
Custom domains are only available with TicketLog PRO tier.
{% endhint %}

Assigning a custom domain name to your service desk helps to simplify TicketLog for your users. Once configured on a custom domain, your service desk will hide all references to the core TicketLog service and prevent users from creating their own service desks. It also means the URL in the address bar does not include the service desk ID, so it's easier to communicate the link with your users.

This arrangement results in less confusion for users and easier management for service desk administrators.

To setup a custom domain you will need to edit your primary domain's DNS settings. If you're unsure how to do this, please contact your IT administrator for assistance.

## Custom domain name request

Setting up a custom domain for your service desk requires three steps.

Firstly, decide on the domain name you would like to use. In most cases, this will be a subdomain to your organization's primary domain. For example, if your primary domain is **contoso.com**, then you might use the subdomain **servicedesk**. Your full custom domain name would therefore be **servicedesk.contoso.com**.

Next, you must arrange for the following DNS records to be added to your domain name.

```
CNAME:
yoursubdomain  —>  ticketlog-cop.trafficmanager.net

TXT:
asuid.yoursubdomain  —>  AE1C39A5008D19965A6876D763061A20789F28D5365F125A6A713DDF66D6C9CB
```

Finally, [contact us](https://ticket-log.com/Contact) and tell use the new domain name. We will complete final steps to enable your custom domain name.

Once completed, your custom domain will appear in the customization settings screen, but it cannot be edited. Please contact us if you'd like to change the custom domain.


# Notification settings

TicketLog will send email notifications to all users who are 'watching' a ticket, when any of the following changes occur on that ticket:

* A comment is added (either in TicketLog or Azure DevOps)
* State has changed
* Title has changed
  * *Title change notifications only occur if notification contents is enabled (see below)*

<figure><img src="https://2014854803-files.gitbook.io/~/files/v0/b/gitbook-x-prod.appspot.com/o/spaces%2FxDo3MABoirR9g57aZyJ1%2Fuploads%2FQSzfBOBYMSWWeZ98IJjs%2Fimage.png?alt=media&amp;token=02d1c984-a115-471e-bab7-fa406d3ab4c1" alt=""><figcaption></figcaption></figure>

## Notification options

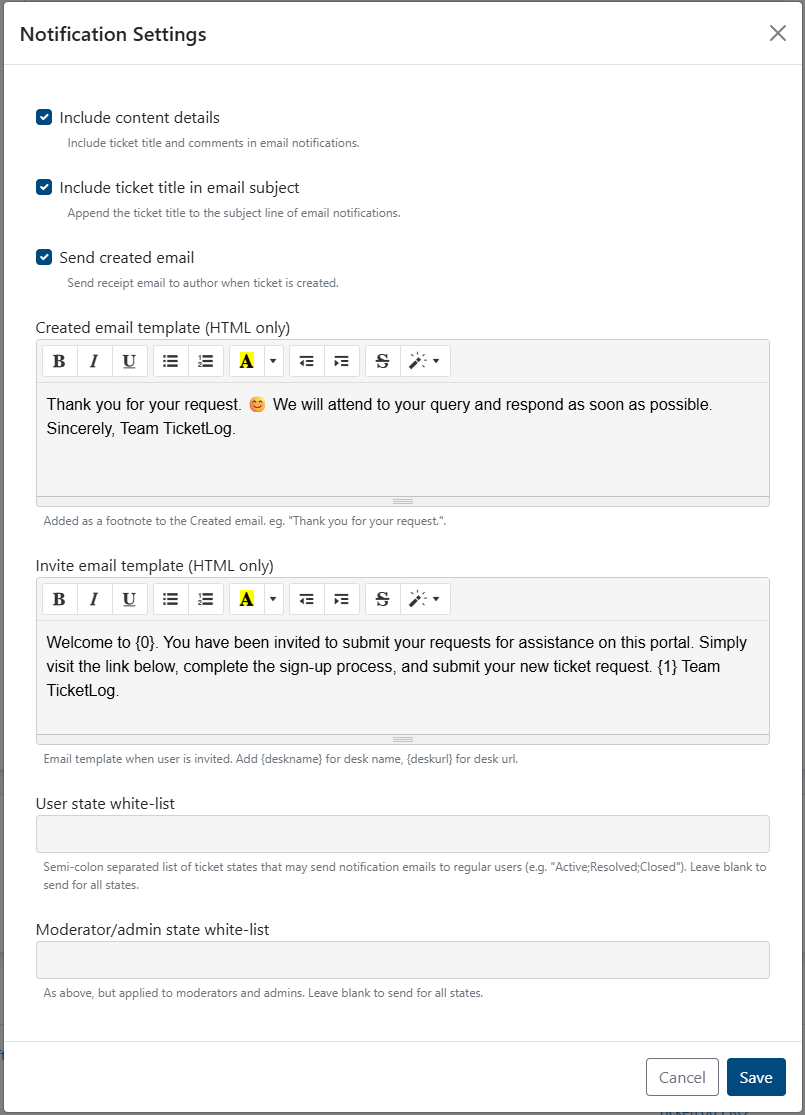
To edit notification options, visit the Customization settings page, and click Notification Settings.

The following settings are available:

<figure><img src="https://2014854803-files.gitbook.io/~/files/v0/b/gitbook-x-prod.appspot.com/o/spaces%2FxDo3MABoirR9g57aZyJ1%2Fuploads%2FfqjtfbNVk4DOCMqMzUkn%2Fimage.png?alt=media&amp;token=336d7109-8da5-4d03-8b76-919a8c86dcb9" alt="" width="563"><figcaption></figcaption></figure>

### Include content details

TicketLog can include contents of new tickets or comments in email notifications.

By default, this option is disabled.

<figure><img src="https://2014854803-files.gitbook.io/~/files/v0/b/gitbook-x-prod.appspot.com/o/spaces%2FxDo3MABoirR9g57aZyJ1%2Fuploads%2FYTQoJ0TrtblEFe1KNRCB%2Fimage.png?alt=media&amp;token=64b5dc6c-2373-486a-80cd-aa5a82d46429" alt="" width="563"><figcaption></figcaption></figure>

### Include ticket title in email subject

When this option is disabled, the subject of email notifications will refer only to the ticket number:

```
Service ticket #330 has been updated
```

When enabled, the title of the ticket will be added to the subject:

```
Service ticket #330 has been updated - Demo of new service ticket
```

By default, this option is disabled.

### Send created email and Created email template

TicketLog can optionally send an email notification when a new ticket is created. This is useful as a courtesy response and includes a link to the ticket in TicketLog.

Use the 'Created email template' panel to customize the message sent in the email.

By default, this option is disabled.

<figure><img src="https://2014854803-files.gitbook.io/~/files/v0/b/gitbook-x-prod.appspot.com/o/spaces%2FxDo3MABoirR9g57aZyJ1%2Fuploads%2F4HimqB0IhAFTeVFJcPjV%2Fimage.png?alt=media&amp;token=1fef4ec3-6c07-4e1a-909f-2690e8820a37" alt="" width="563"><figcaption></figcaption></figure>

### Invite email template

TicketLog can include a customized message to invitation emails.

Use curly-brace notation ( {} ) to insert pre-determined parameters:

* **{deskname}** - insert the name of the desk
* **{deskurl}** - insert the direct url for the service

By default, this option is disabled.

<figure><img src="https://2014854803-files.gitbook.io/~/files/v0/b/gitbook-x-prod.appspot.com/o/spaces%2FxDo3MABoirR9g57aZyJ1%2Fuploads%2FzkEKhK1MvjI9hgI0jFVi%2Fimage.png?alt=media&amp;token=ffe2895f-2fce-483f-8ae8-3ea41f323108" alt="" width="563"><figcaption></figcaption></figure>

### Notification filter by status

Administrators can now configure notifications to be filtered by state. If a ticket update occurs when that ticket is not in a specified state, a notification will not be sent.

By default, no filter is applied and all notifications are sent.

A separate filter can be specified for regular users and for Admin/Moderators.

<figure><img src="https://2014854803-files.gitbook.io/~/files/v0/b/gitbook-x-prod.appspot.com/o/spaces%2FxDo3MABoirR9g57aZyJ1%2Fuploads%2F1U47Hy1DyqHmc9XfWEFd%2Fimage.png?alt=media&amp;token=4395bd82-b01b-4bdd-9b31-5a31bdbd0b35" alt=""><figcaption></figcaption></figure>


# Single Sign On (SSO)

If you would like SSO enabled for your organization's service desk, please contact TicketLog support.

Single Sign On with TicketLog is only available:

* With TicketLog Pro
* For service desks with a [custom domain](/documentation/administrators-guide/custom-domain)
* For Microsoft Entra ID as your identity provider (Idp)

## Setup SSO with Entra ID

To setup SSO on your Entra ID tenant, follow these steps:

1. Add a new App Registration to Entra
   * Name it "TicketLog SSO"
   * Single tenant
   * Redirect URI (Web): <https://ticketappb2c.b2clogin.com/ticketappb2c.onmicrosoft.com/oauth2/authresp>&#x20;
   * Record the **Application (client) ID**
2. Create a Secret
   * Select **Certificates & secrets**, and then select **New client secret**.
   * Enter a **Description** for the secret, select an expiration, and then select **Add**.
   * Record the **Value** of the secret
3. Assign users
   * Either add users and groups to the application who you want to have access to TicketLog, or set 'Assignment Required' to No.
   * Note, this does not automatically create TicketLog accounts. Each account is created at the time of first sign in to TicketLog.
4. Set branding & properties (optional)
   * Set a logo and homepage for the application. This can be used in your Enterprise My Apps page (additional configuration is required).
5. Add token claims
   * Select **Token configuration**.
   * Select **Add optional claim**.
   * For the **Token type**, select **ID**.
   * Select the optional claims to add:  `email` ,`family_name` and `given_name`.
   * Select **Add**.
   * If **Turn on the Microsoft Graph profile permission (required for claims to appear in token)** appears, enable it, and then select **Add** again.
6. Pass details to TicketLog
   * Pass the following details to TicketLog:
     * **Application (client) ID** from above
     * Secret **Value** from above
     * Tenant **primary domain**
       * This is not the name of the tenant.
       * In Azure portal or Entra Admin portal, primary domain appears here:

         <figure><img src="https://2014854803-files.gitbook.io/~/files/v0/b/gitbook-x-prod.appspot.com/o/spaces%2FxDo3MABoirR9g57aZyJ1%2Fuploads%2Fgt2kMvnkLIN4e76Yt18L%2Fimage.png?alt=media&amp;token=260d359e-cd74-4fdc-9639-88f87b4a69b9" alt="" width="563"><figcaption></figcaption></figure>
       * If you don't have a primary domain, we can also accept your \*.onmicrosoft.com domain or your Tenant ID. However, a custom domain name is better as it provides a hint to the login process to improve the sign-up and sign-in process.

Please note:

* When adding users to Entra, ensure you also set the Email property. Doing so will simplify the user's signup experience.
* When users first sign in to TicketLog using SSO, they will be faced with a signup screen. They need to confirm their email address by sending a verification code.
* Please instruct users to follow the on-screen instructions, and ask they do NOT alter the email address.


# 💎 TicketLog PRO

For added benefits and features, upgrade your service desk to TicketLog PRO with a monthly subscription.

### How to Upgrade to TicketLog PRO

Upgrading a service desk to PRO requires two steps:

1. [Purchase](https://localhost:7066/Order/BuyPro) a TicketLog PRO subscription
2. Apply the subscription to your service desk (see below)

Purchased subscriptions are associated with your user account. You must then apply the subscription to a service desk for it to take effect.

Subscriptions are transferrable between service desks. They can be applied and unapplied as required.

### Apply PRO Subscription to Service Desk

Before you can apply a PRO subscription to a service desk:

* You must be an Administrator of the service desk
* You must have purchased a TicketLog PRO subscription

To apply the PRO subscription to a service desk:

1. Open the service desk's Settings page
2. Click Upgrade to PRO button

<figure><img src="https://2014854803-files.gitbook.io/~/files/v0/b/gitbook-x-prod.appspot.com/o/spaces%2FxDo3MABoirR9g57aZyJ1%2Fuploads%2F1xw3yWspw8ScdcFbF2UA%2Fimage.png?alt=media&amp;token=a7c3c4f5-9cc9-498d-900f-67ffc0a30ef3" alt="" width="563"><figcaption></figcaption></figure>

Alternatively, you can visit the My Service Desks page and click the Upgrade button next to the intended service desk.

Once you have applied a PRO subscription to a service desk, you will be known as the service desk's Owner, and you cannot be removed.

### View all PRO Subscriptions

From the My Account page you can view a list of all purchased PRO subscriptions, and which service desk (if any) each is applied to:

<figure><img src="https://2014854803-files.gitbook.io/~/files/v0/b/gitbook-x-prod.appspot.com/o/spaces%2FxDo3MABoirR9g57aZyJ1%2Fuploads%2F3aG6I6DlomVf0ZM8lus4%2Fimage.png?alt=media&amp;token=0763156e-a8b0-4bbb-b6f7-6502f4ca4a8f" alt="" width="563"><figcaption></figcaption></figure>

### Cancel a PRO Subscription

To cancel a subscription visit the My Account page, find the appropriate subscription in the list of subscriptions and click the Cancel button.

If the cancelled subscription is currently applied to a service desk, the service desk will be downgraded to the Free tier automatically.

### TicketLog PRO Features

<table><thead><tr><th width="395"></th><th align="center">TicketLog Free</th><th align="center">TicketLog PRO 💎</th></tr></thead><tbody><tr><td>Secure Service Desk portal</td><td align="center">Yes</td><td align="center">Yes</td></tr><tr><td>Automated Email Notifications</td><td align="center">Yes</td><td align="center">Yes</td></tr><tr><td>Users</td><td align="center">5</td><td align="center">100</td></tr><tr><td>Custom Branding</td><td align="center">-</td><td align="center">Yes</td></tr><tr><td>Custom Domain</td><td align="center">-</td><td align="center">Yes</td></tr><tr><td>Custom Input Fields</td><td align="center">-</td><td align="center">Yes</td></tr><tr><td>Multiple Submission Forms</td><td align="center">-</td><td align="center">Yes</td></tr><tr><td>Restrict New Users to Domain</td><td align="center">-</td><td align="center">Yes</td></tr><tr><td>Single sign-on (SSO) with Entra ID</td><td align="center">-</td><td align="center">Yes</td></tr></tbody></table>


# Azure DevOps extension

TicketLog is available on the Azure DevOps Marketplace as an extension. The extension is a helpful utility to get started with your first service desk, but it is not required for TicketLog to function with your ADO project.&#x20;

The extension is available here:&#x20;

{% embed url="<https://marketplace.visualstudio.com/items?itemName=BlueAnvilSoftware.TicketLog-Extension>" %}

Once installed, it adds the following page to **Project Settings** > **Extensions**:

{% hint style="info" %}
*You must be logged in to ADO as a Project Administrator to see the Create Service Desk and Authorize buttons.*
{% endhint %}

<figure><img src="https://2014854803-files.gitbook.io/~/files/v0/b/gitbook-x-prod.appspot.com/o/spaces%2FxDo3MABoirR9g57aZyJ1%2Fuploads%2FptDZaaU0aSIqQO2B1c2q%2Fimage.png?alt=media&amp;token=40f65b73-9f72-4b0a-90ea-4a41dd9cf6c9" alt=""><figcaption></figcaption></figure>

## Create service desk

Clicking Create Service Desk will redirect to TicketLog website and prompt you to create a new service desk connected to the open project:

<figure><img src="https://2014854803-files.gitbook.io/~/files/v0/b/gitbook-x-prod.appspot.com/o/spaces%2FxDo3MABoirR9g57aZyJ1%2Fuploads%2FiFxJSKWCAtW8Gk74udH8%2Fimage.png?alt=media&amp;token=4c1d3a6c-68fb-483f-af06-2e2e0e7a4a2e" alt=""><figcaption></figcaption></figure>

## Authorize service desk

Usually, you would authorize the Integration use via TicketLog's Azure DevOps configuration page (see: [Authorizing Azure DevOps](/troubleshooting/authorizing-azure-devops)). However, you can also trigger the authorization flow for each connected service desk from the extension by clicking the respective Authorize button. This approach allows you to check you are signed in to ADO as the correct integration user before authorization.&#x20;

If you find your integration user is wrong, we recommend using this method to switch to the correct integration used.&#x20;

First, check the "User" field at the top of the page,. If not, then sign out of ADO and sign in with the intended Integration user.

Then click Authorize and compelte the authorization steps. If the Authorize button does not appear next to the service desk link, then it means your user is not a Project Administrator. The Integration user must be a Project Administration before authorization can happen.


# Data & security

TicketLog's application and data storage is hosted on Microsoft Azure servers in Netherlands. This data includes application data, configuration settings, tokens, and caches. As system administrators, we have access to this data.\
\
For user login management we use Azure AD B2C, which is a special instance of Microsoft's Azure Active Directory service to manage federated logins. Our Azure AD B2C server is hosted in the United States. As system administrators, we have access to the list of login email addresses, but not to passwords as they are hashed.\
\
For ticket data, we do not capture or store ticket Descriptions, Comments, or most other fields. We fetch these details via Azure DevOps API's on each request. However, we do cache each ticket's Title and State field to improve system performance on list screens. We can disable this cache if requested, but this will impact performance. Data is stored in a multi-tenant database, however with our limited data capture the potential for personal data exposure during an adverse event is remote.\
\
For Azure DevOps (ADO) integration, we recommend customers setup a dedicated integration account in ADO. For example, <ticketlog@yourcompany.com>. Customers can place restrictions on this account to limit which ADO project(s) TicketLog can interact with. We do not store the password for this integration - each connection must be authorized during setup, which provides us with an access token scoped only for the requested functions. These functions do not include user management functions, which limits the potential for privilege elevation via this access point. Customers can deauthorize their integration account at any time from the Azure DevOps portal.<br>

*Last updated: 2024.06.14*


# How to connect to Azure DevOps

{% hint style="info" %}
This article discusses connecting to Azure DevOps with *Legacy Azure DevOps OAuth* method.

For instructions on connecting with *Microsoft Entra ID* method, visit the [Administrators guide](/documentation/administrators-guide/azure-devops-settings).
{% endhint %}

When authenticating to AzureDevOps using the *Legacy Azure DevOps OAuth* method, we recommend setting up the connection from TicketLog to Azure Devops from a Guest browser session. This way, you will not be logged in to any other Microsoft accounts that may otherwise interfere with the process.

We also recommend that you use a dedicated user in Azure DevOps for this purpose. We refer to this as the *Integration user.* This is so you can better control the permitted access between TicketLog and Azure DevOps. It also ensures that all interactions are recorded against the *Integration user* instead of a regular user, which may otherwise cause confusion.

Below is our recommended process for setting up this connection. This process should work even if a connection has already been attempted or completed.

## Quick setup guide

1. Open a new *Guest* browser session.
   * **Chrome:** Click your profile icon in the top-right corner and select 'Open Guest Profile'.
   * **Edge:** Click your profile icon in the top-right corner and select  'Other Profiles > Browse as Guest'.<br>

     <figure><img src="https://2014854803-files.gitbook.io/~/files/v0/b/gitbook-x-prod.appspot.com/o/spaces%2FxDo3MABoirR9g57aZyJ1%2Fuploads%2FjwqasLjpNIku0ZLua16v%2Fimage.png?alt=media&amp;token=b8f8a8da-0cdc-4939-9188-9753aa145410" alt="" width="563"><figcaption></figcaption></figure>

2. Visit [Azure DevOps website](https://dev.azure.com/) and sign in with your intended *Integration user*.

3. In the same Guest browser session, open a new tab and visit [TicketLog website](https://ticket-log.com/). Sign in with your TicketLog user.

4. In TicketLog, navigate to your service desk's Azure DevOps settings page.

5. Ensure the **Organization URL** and **Project** settings are entered correctly.

6. Click 'Save & Authorize'. You will see a screen asking  to accept the integration with Azure DevOps. Check the email address shown at "1" is the correct *Integration user*, then Click 'Accept'.<br>

   <figure><img src="https://2014854803-files.gitbook.io/~/files/v0/b/gitbook-x-prod.appspot.com/o/spaces%2FxDo3MABoirR9g57aZyJ1%2Fuploads%2FYkL0gN05o3GsiOiCBKZB%2Fimage.png?alt=media&amp;token=30315ae5-73ca-43f2-bcef-100aa27c320c" alt="" width="563"><figcaption></figcaption></figure>

7. You will be redirected back to the TicketLog website. Wait for the *Check Connection* process to complete. If successful, you will see "Status: OK".

If this process is not successful, please contact [TicketLog support](https://ticket-log.com/contact) or review the [Azure DevOps troubleshooting page](/troubleshooting/authorizing-azure-devops).


# How to chart user activity

A customer asked how to see a report of the number of tickets each user has created.

This can be done by combining Parameter Values with Azure DevOps Queries:

<figure><img src="https://2014854803-files.gitbook.io/~/files/v0/b/gitbook-x-prod.appspot.com/o/spaces%2FxDo3MABoirR9g57aZyJ1%2Fuploads%2F5JkGosUKzINh1ZQE9WXc%2Fimage.png?alt=media&amp;token=bd1a05b6-7f56-4973-93ff-98366fe50262" alt="" width="563"><figcaption></figcaption></figure>

There are four steps to take:

1. In DevOps, create a custom field called *TicketLog Creator* (or similar). Make sure this is added to the workitem type of your service desk's target project.
2. In TicketLog, configure each form in the service desk to have the custom field set to a [parameter value](/documentation/administrators-guide/forms-and-fields#parameter-values). Select *Username* or *User email*.&#x20;
3. In DevOps, create a new Query that selects the workitem types you want in your report. Make sure to add the custom field to the columns of the query, and any filters you'd like.
4. Select the Charts tab in the query and add a chart. Select your custom field as the Group by field. Save the chart and check it works as expected.

Additionally, if you'd like the chart to appear on a dashboard, add the 'Chart for Work Items' widget to the dashboard and configure the same way.

{% hint style="info" %}
To use queries on a dashboar widget, you must move the query to Shared Queries.
{% endhint %}


# How to sign-in with SSO

{% hint style="info" %}
For details on how to setup SSO on your service desk, refer to: [2025.05.21: Single Sign On (SSO)](/release-notes/2025.05.21-single-sign-on-sso)
{% endhint %}

Once SSO is configured for your service desk and Enterprise Application in Entra ID, your users can sign in to Ticket Log using their Microsoft credentials.&#x20;

However, on first sign in, users will need to complete a new user setup step before using TicketLog. This requires users to verify their email address and name.

The video below shows how a user launches TicketLog from Microsoft MyApps page, then completes the sign-up and email verification step:&#x20;

{% embed url="<https://vimeo.com/1088281587/397e0105ed>" %}


# How to send emails for new tickets

TicketLog can optionally send an email to the author when a new ticket is created.

However, some users would like emails sent more broadly to support team members.

It possible to do this from within Azure DevOps itself.

From Azure DevOps:

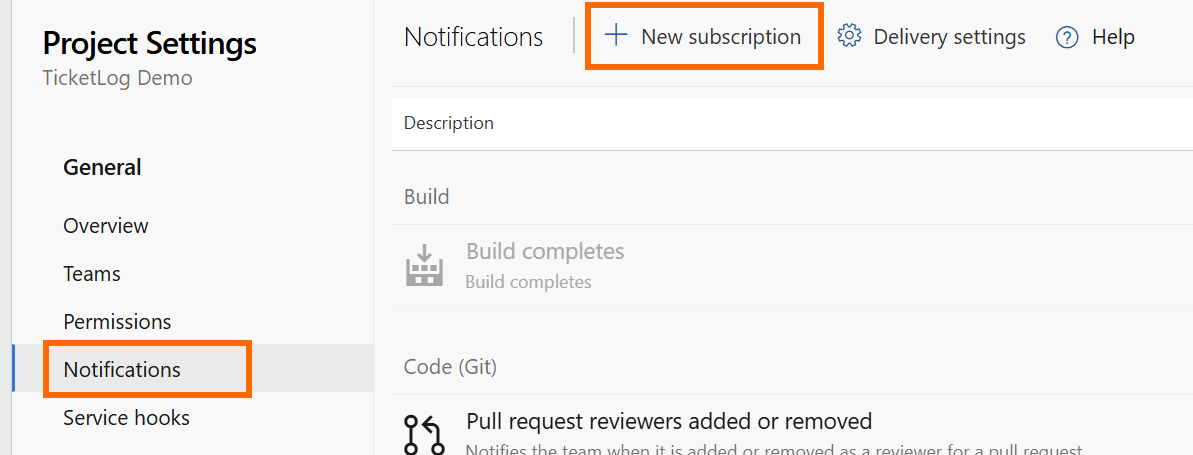
1. Click **Project Settings** > **Notifications > New subscription**<br>

   <figure><img src="https://2014854803-files.gitbook.io/~/files/v0/b/gitbook-x-prod.appspot.com/o/spaces%2FxDo3MABoirR9g57aZyJ1%2Fuploads%2FUMaXIUTSLtvzKcH9owxq%2Fimage.png?alt=media&amp;token=ff2cd40d-e8c5-433d-a6f6-e63f5e90c725" alt="" width="563"><figcaption></figcaption></figure>

2. Select **Work** > **A work item is created**<br>

   <figure><img src="https://2014854803-files.gitbook.io/~/files/v0/b/gitbook-x-prod.appspot.com/o/spaces%2FxDo3MABoirR9g57aZyJ1%2Fuploads%2FoMRH5p2Ld6h0sTTEfH1j%2Fimage.png?alt=media&amp;token=f49620ed-f4c0-4bb4-ae42-308bdc7c2e36" alt="" width="563"><figcaption></figcaption></figure>

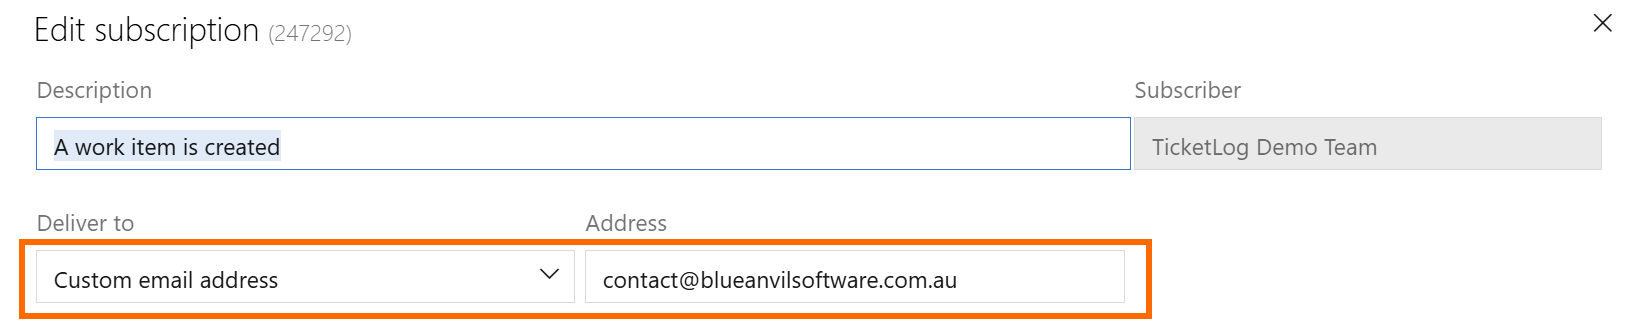
3. Set 'Deliver to' as 'Custom email address', and set your distribution email address<br>

   <figure><img src="https://2014854803-files.gitbook.io/~/files/v0/b/gitbook-x-prod.appspot.com/o/spaces%2FxDo3MABoirR9g57aZyJ1%2Fuploads%2FWI0hurMsaAykILkPcXn0%2Fimage.png?alt=media&amp;token=9c8a1d58-b6ed-45cf-a7bd-79272a251d27" alt="" width="563"><figcaption></figcaption></figure>

4. Add the following Filter clause:
   * Field: **Tags**
   * Operator: **Contains value**
   * Value: **TicketLog**
     * *Value must match the Tag configured in your TicketLog form settings*<br>

       <figure><img src="https://2014854803-files.gitbook.io/~/files/v0/b/gitbook-x-prod.appspot.com/o/spaces%2FxDo3MABoirR9g57aZyJ1%2Fuploads%2FdNQlBJFIsmdx1g50U2yf%2Fimage.png?alt=media&amp;token=5cffc882-1792-4610-bb9d-bd26bf0802e8" alt="" width="563"><figcaption></figcaption></figure>

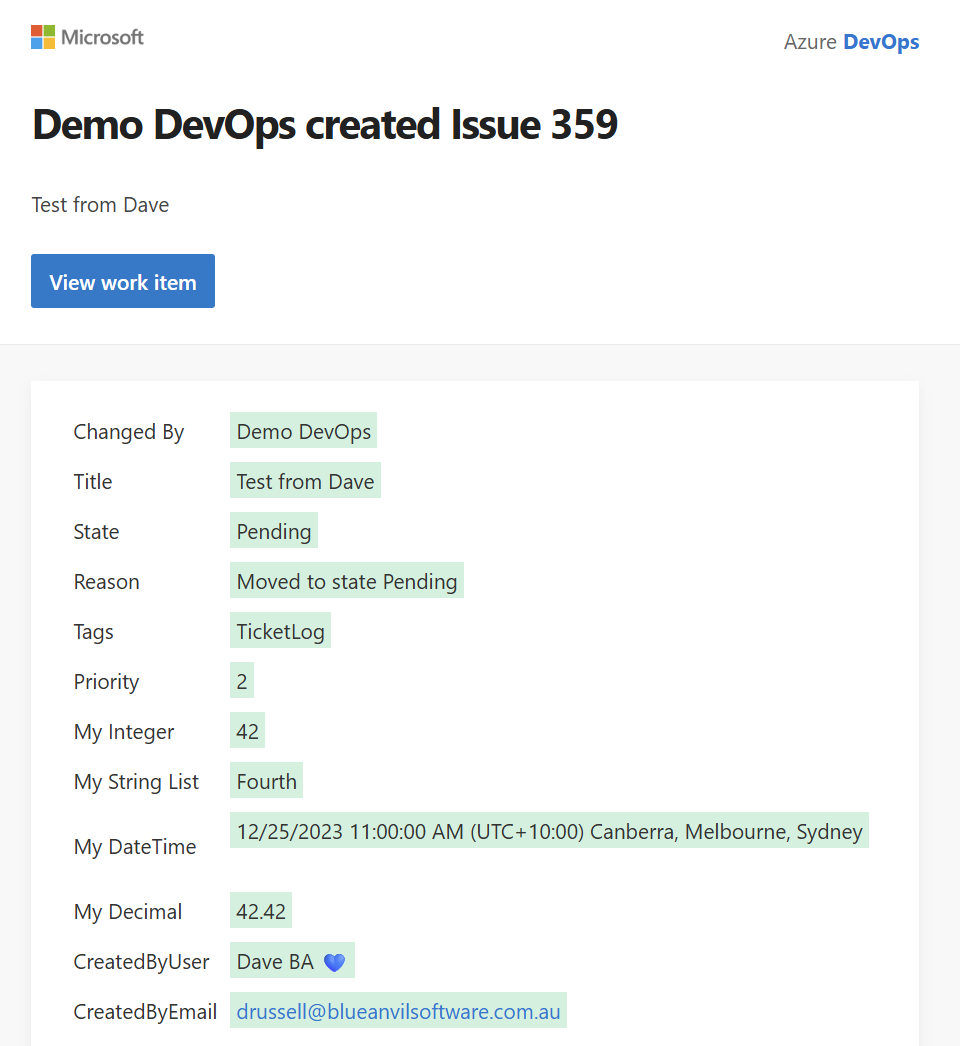
Here is a sample of the email notification people will receive:

<figure><img src="https://2014854803-files.gitbook.io/~/files/v0/b/gitbook-x-prod.appspot.com/o/spaces%2FxDo3MABoirR9g57aZyJ1%2Fuploads%2FnaIUtNbO6aiQ1qAzgOhk%2Fimage.png?alt=media&amp;token=812cea3d-2fd3-402a-ba9f-a04ce7398d12" alt="" width="563"><figcaption></figcaption></figure>


# How to post notifications to MS Teams

You may like to be notified in Microsoft Teams when a TicketLog workitem is created in Azure DevOps.

This can be done with the Azure Boards app for MS Teams.&#x20;

To setup the app, follow these steps:

1. From MS Teams, add the app called "Azure Boards" and select the channel where you would like notifications to be posted.<br>

   <figure><img src="https://2014854803-files.gitbook.io/~/files/v0/b/gitbook-x-prod.appspot.com/o/spaces%2FxDo3MABoirR9g57aZyJ1%2Fuploads%2F2R1AY8yvOPfy350uUOWd%2Fimage.png?alt=media&amp;token=23ae7e03-0f54-4049-90d6-457d3c774ae1" alt="" width="543"><figcaption></figcaption></figure>

2. Switch to the target channel. You should see a post from Azure Boards indicating the app has been added to the channel.<br>

   <figure><img src="https://2014854803-files.gitbook.io/~/files/v0/b/gitbook-x-prod.appspot.com/o/spaces%2FxDo3MABoirR9g57aZyJ1%2Fuploads%2FnZUbPu5I9YgKx6ddtWqR%2Fimage.png?alt=media&amp;token=ab07c087-4027-4493-b841-9356c9af7acf" alt="" width="386"><figcaption></figcaption></figure>

3. Click 'Reply in thread' and enter the following commands:
   1. @Azure Boards signin
      * Signing in with an Azure devops user, who has Administrator privilege in Azure DevOps.
   2. @Azure Boards link <https://dev.azure.com/**myorg**/**myproject>\*\*

      * Change *myorg* and *myproject* in the url to the same organization and project used in your TicketLog service desk<br>

      <figure><img src="https://2014854803-files.gitbook.io/~/files/v0/b/gitbook-x-prod.appspot.com/o/spaces%2FxDo3MABoirR9g57aZyJ1%2Fuploads%2FMYFe7vIqYJMKhVI6ian4%2Fimage.png?alt=media&amp;token=dcbef3f4-f2de-4331-9f61-b2df2f3d4df0" alt="" width="382"><figcaption></figcaption></figure>

4. Click the 'Add subscription' button and select 'Work item created'. Also consider adding the Tag filter 'TicketLog' to ensure only TicketLog workitems generate a notification. Click Submit.<br>

   <figure><img src="https://2014854803-files.gitbook.io/~/files/v0/b/gitbook-x-prod.appspot.com/o/spaces%2FxDo3MABoirR9g57aZyJ1%2Fuploads%2FXzTMfAOu6VjLf4y1aE2I%2Fimage.png?alt=media&amp;token=92d596dd-3851-4375-a34d-83d535323c73" alt="" width="351"><figcaption></figcaption></figure>

   * *Note: If required, add or remove subscriptions with the command: @Azure Boards subscriptions*

5. A new post will be added to the channel indicating if this is successful or failed. If it failed, address the error and try again.<br>

   <figure><img src="https://2014854803-files.gitbook.io/~/files/v0/b/gitbook-x-prod.appspot.com/o/spaces%2FxDo3MABoirR9g57aZyJ1%2Fuploads%2FjX4aAadIBnKjtKgpJ5hA%2Fimage.png?alt=media&amp;token=bafd8452-1aff-4e7c-9fca-6806d2402c8a" alt="" width="335"><figcaption></figcaption></figure>

6. Try creating a ticket from the TicketLog service desk and verify the notification appears. It may take 10-60 seconds to appear.<br>

   <figure><img src="https://2014854803-files.gitbook.io/~/files/v0/b/gitbook-x-prod.appspot.com/o/spaces%2FxDo3MABoirR9g57aZyJ1%2Fuploads%2Fpxw10V6Z4NmibwdAeQMw%2Fimage.png?alt=media&amp;token=90a692c3-ebdb-4c95-a133-65a43529320e" alt="" width="339"><figcaption></figcaption></figure>


# Authorizing Azure DevOps

Solve issues with authorizing your Azure DevOps integration

## Check your Azure DevOps connection

If you have problems connecting TicketLog to Azure DevOps, please review the steps below.

<figure><img src="https://2014854803-files.gitbook.io/~/files/v0/b/gitbook-x-prod.appspot.com/o/spaces%2FxDo3MABoirR9g57aZyJ1%2Fuploads%2FI751xMYyM07D2blfru6C%2Fimage.png?alt=media&amp;token=5a74cb7a-c4a4-4056-abae-8bd0b941796f" alt="" width="563"><figcaption></figcaption></figure>

1. Before connecting TicketLog to Azure DevOps:\
   \
   You must choose which Azure DevOps user you would like to act as the **Integration user**. The Integration user's name will appear on all comments, so instead of using a personal account you may prefer to use a dedicated user account (such as *<devops@your-company.com>*).\
   \
   If you decide to use a dedicated account, you must create this account with the proper access privilages (Project Administrator) for your Azure DevOps project. We recommend authorizing the Integration user from the Visual Studio Extension instead of from TicketLog configuration page. See [Azure DevOps extension](/documentation/azure-devops-extension#authorize-service-desk) for more information on this method.
2. If you see the error *"Identity {Identity number} has not been materialized, please use interactive login over the browser first"* this means that the user has not completed a first-time sign in to Azure DevOps. Please sign in to Azure DevOps with this user to setup the user's account.
3. Check that the Integration user is a Project Administrator of the target project.
   * Visit **Organization Settings** > **Users**.
   * Find the Integration user and select **Manage User** in the context menu.
   * For the intended project, select *Project Administrators*.<br>

     <figure><img src="https://2014854803-files.gitbook.io/~/files/v0/b/gitbook-x-prod.appspot.com/o/spaces%2FxDo3MABoirR9g57aZyJ1%2Fuploads%2F9oOJb5Krd4n7NAydD0RT%2Fimage.png?alt=media&amp;token=f4b7d3d8-844e-4095-ba74-76b63eca78a6" alt=""><figcaption></figcaption></figure>
4. Check that API access is permitted for your Organization.
   * Visit **Organization Settings** > **Policies**.
   * Ensure *Third-party application access via OAuth* is **On**.<br>

     <figure><img src="https://2014854803-files.gitbook.io/~/files/v0/b/gitbook-x-prod.appspot.com/o/spaces%2FxDo3MABoirR9g57aZyJ1%2Fuploads%2F2XHKBWKYYVb3ZzZD7hyW%2Fimage.png?alt=media&amp;token=070dfc4b-df8d-4755-a935-4c7021dbf8de" alt=""><figcaption></figcaption></figure>
5. Check the Integration user has been granted access to the project.
   * Open a new *Incognito* or *Private* browser session.
   * Visit the Azure Dev Ops "AEX" page here:
     * <https://aex.dev.azure.com/me>
   * Log into Azure DevOps with the Integration user.
   * Click **Manage authorizations** in the bottom left:<br>

     <figure><img src="https://2014854803-files.gitbook.io/~/files/v0/b/gitbook-x-prod.appspot.com/o/spaces%2FxDo3MABoirR9g57aZyJ1%2Fuploads%2FbRwL1YOeokagEeRGEdu8%2Fimage.png?alt=media&amp;token=906704dd-ffa0-4cf5-8275-3f9cbe1179cc" alt=""><figcaption></figcaption></figure>
   * In the popup, you should see "TicketLog" as an authorized application:\ <br>

     <figure><img src="https://2014854803-files.gitbook.io/~/files/v0/b/gitbook-x-prod.appspot.com/o/spaces%2FxDo3MABoirR9g57aZyJ1%2Fuploads%2FeRraLqRzvpfFNo7f6atw%2Fimage.png?alt=media&amp;token=a13a4c40-27bb-4035-b3a1-7fda49264ac0" alt=""><figcaption></figcaption></figure>
6. Check the Integration user is from the intended Directory.
   * If your Integration user has access to multiple directories, then you must carefully ensure you have authorized the user from the proper directory.
   * Open a new Incognito or Private browser session.
   * Visit the Azure Dev Ops "AEX" page here:
     * <https://aex.dev.azure.com/me>
   * Log into Azure DevOps with the Integration user.
   * Check each directory in the drop list (see "1" in screenshot), and verify in "Manage Authorizations" (see "2" in screenshot) that you have given authorization to the correct directory.<br>

     <figure><img src="https://2014854803-files.gitbook.io/~/files/v0/b/gitbook-x-prod.appspot.com/o/spaces%2FxDo3MABoirR9g57aZyJ1%2Fuploads%2FA1cLmnNha4mtGmBQFO95%2Fimage.png?alt=media&amp;token=5648c31e-8795-4805-bef0-88004f37a1ce" alt=""><figcaption></figcaption></figure>
   * If it is missing, then you can simply re-authorize from TicketLog configuration page. When doing so, check the correct user (see "1" in screenshot) and Directory (see "2" in screenshot) are being used.
     * *Note: the Grant Access step will use the directory most recently selected in the "AEX" page.*<br>

       <figure><img src="https://2014854803-files.gitbook.io/~/files/v0/b/gitbook-x-prod.appspot.com/o/spaces%2FxDo3MABoirR9g57aZyJ1%2Fuploads%2FPabqq4wY80IZ7gMv7apU%2Fimage.png?alt=media&amp;token=22ac905b-19e0-4d33-871b-c5c2e3cda530" alt=""><figcaption></figcaption></figure>

## Additional Requirements

TicketLog assumes the Azure DevOps project being connected to is based on a Basic, Agile, or CMMI project template, and that standard Project Administrator permissions are set for the integration user. TicketLog does support customised project templates or user permissions, however there are a few requirements:

* The target Project has correct workitem type.
  * By default, TicketLog uses the "Issue" type, however other workitem types are configurable in TicketLog settings.
* The integration user is allowed to create Service Hooks
* The intgation user is allowed to create Tags
* The target Area Path exists
  * By default, no Area Path is specified.
* There are no unexpected "required" fields.
  * The standard required fields are: IterationId, AreaId, Title, and State. No other required system fields are currently supported.&#x20;
  * Required custom fields are supported, but this requires a TicketLog PRO subscription and properly configured Custom fields.<br>


# Integration with Azure DevOps

Occasionally, you may find that the integration between Azure DevOps and TicketLog does not work as expected. On this page you will find instructions to check for common errors.

### Email notifications are not sent for new or updated tickets

Email notifications from TicketLog rely on API messages sent from Azure DevOps to TicketLog. You can check if these messages are being sent successfully from within Azure DevOps.

* In Azure DevOps, visit your project
* Click Project Settings > Service hooks
* Ensure there are three Web Hooks configured:
  \*

  ```
  <figure><img src="/files/uoCLX3XB5UJnkEBfsDhm" alt=""><figcaption></figcaption></figure>
  ```
* Check the 7 Day Status column for errors
* If a 7 Day Status column is red, right-click on that item and select History
* Review the error. If you need assistance, please contact TicketLog support.

It may be a temporary error. You can try resetting the configuration from TicketLog:

* In TicketLog, open the Service Desk Settings
* Click the Azure DevOps tab
* Click Check Connection and wait for it to complete
* Create a test ticket, and edit that ticket from Azure DevOps, to check if the email notifications have been repaired.
* If still a problem, check the API messages again (as above), and contact TicketLog support for help.

### "Subscription has been disabled" email

If there is an error processing updates from Azure DevOps to your TicketLog Service Desk then this may cause the Web Hooks to become disabled automatically.

If this happens, you should be notified by an email from Azure DevOps, sent to your *Integration user* email address:

<figure><img src="https://2014854803-files.gitbook.io/~/files/v0/b/gitbook-x-prod.appspot.com/o/spaces%2FxDo3MABoirR9g57aZyJ1%2Fuploads%2Fs083qNmrYbsm2ij0Io2J%2Fimage.png?alt=media&amp;token=edbccc40-7360-44ce-a053-e9fd32e57d30" alt="" width="563"><figcaption></figcaption></figure>

You can try resetting the configuration from TicketLog:

* In TicketLog, open the Service Desk Settings
* Click the Azure DevOps tab
* Click Check Connection and wait for it to complete
* Create a test ticket, and edit that ticket from Azure DevOps, to check if the email notifications have been repaired.
* If still a problem, check the API messages again (as above), and contact TicketLog support for help.


# SSO issues

{% hint style="info" %}
This page is a work in progress while we attend to reported issues with Single Sign On.
{% endhint %}

If you have issues with users unable to sign up or sign in with SSO, please first check the following:

* SSO is only possible on a custom domain, not on the \*.ticket-log.com/\<deskID> domain.
* Check that the user is added to the Application in your Entra configuration.
* **Important:** Check that the user in Entra has the 'Email' field specified correctly.

Most issues with SSO are caused by either multiple active Microsoft logins (for example, a work and personal account), or caching issues with the browser.

Try the following solutions:

1. Visit [myaccount.microsoft.com](https://myaccount.microsoft.com/) and sign out of the current account. Repeat this until all accounts are signed out.
2. Force a full refresh of TicketLog, by pressing CTRL+R while on the service desk home page.
3. Open Developer Tools in your browser (press F12), select the network tab, and enable Disable Cache mode. Try signing in again while the Developer Tools are open.


# Change history

Below is a list of major and minor releases of TicketLog. Many major releases will have a dedicated page to explain new features in detail.

## 2026

### 2026.09.03

This is a minor release. Changes include:

* Added option "Include ticket title in email subject" to Email Notification settings.

### 2026.08.10

This is a minor release. Changes include:

* Multi-file upload on new tickets can now be selected from multiple local locations.

### 2026.07.09

This is a major release. See full release note here: [2026.07.09: Notification filter](/release-notes/2026.07.09-notification-filter)

Changes include:

* Ability to filter notification emails by ticket state.
* Added link to Stripe billing portal to change Payment Method
* Fix for file attachments with unusual characters in filename

### 2026.05.16

This is a minor release. Changes include:

* Added option to authenticate Azure DevOps with Entra ID.
  * Supports Organization ID only.
* Moved /Welcome page to root page.

### 2026.05.12

This is a major release, but does not include new features:

* Maintenance release to improve security, diagnostic, and stability.

### 2026.05.06

This is a minor release. Changes include:

* Custom fields now use the Azure DevOps field 'Label' if it is available.
  * Existing custom fields need to be re-saved via Configure Form Fields to pick up the label.

### 2026.04.29

This is a minor release. Changes include:

* Free service desks limited to maximum 5 per user.
* Notification emails for added attachments will be delayed by 10 seconds.

### 2026.04.08

This is a minor release. Changes include:

* Added Service Desk Switcher to top navigation bar.<br>

  <figure><img src="https://2014854803-files.gitbook.io/~/files/v0/b/gitbook-x-prod.appspot.com/o/spaces%2FxDo3MABoirR9g57aZyJ1%2Fuploads%2Fj3CgrVQQTETdqMbwzJFq%2Fimage.png?alt=media&amp;token=eee4cede-ba15-4d8c-8a47-961fb68fb26c" alt="" width="186"><figcaption></figcaption></figure>

### 2026.04.03

This is a minor release. Changes include:

* Added support for multiple-file uploads on New Ticket and New Comment pages.

### 2026.04.1

This is a minor release. Changes include:

* Fix for notification emails sent to ex-watches. Now, when a watcher is removed from a ticket, they will no longer receive email notifications.

## 2025

### 2025.07.25

This is a minor release. Changes include:

* Added 'Closed states' field. Tickets who are in a closed state do not allow comments to be added.

### 2025.07.18

This is a minor release. Changes include:

* Show All Tickets has been changed to fix the result values shown at the end of the screen:
  * The reported numbers are now more accurate.
  * Where a ticket is expected but not found in the associated DevOps project, it will appear in red. Previously, such tickets would be excluded from the results, causing the reported numbers to be inaccurate. Clicking a red ticket may or may not load the ticket, depending on whether the integration user has direct access to the ticket.
  * Search results have been improved, but now will only return as all results (ie. no longer paged).
* TicketLog logo updated.

### 2025.07.04

This is a minor release. Changes include:

* Email notifications now indicate the author of changes made from both TicketLog portal and Azure DevOps portal.
* Added 'Transfer ownership' command to Admin Users screen.
  * Target user must be an Admin and have completed their sign-up.&#x20;
  * Does not update Stripe billing account. To do so, contact TicketLog support.

### 2025.06.30

This is a minor release. Changes include:

* 'Share this ticket' is now permitted for all users.
* Notification emails no longer sent to removed users.
* Fix for Show All Tickets screen to show tickets of all ADO workitem types used by all forms. Previously, only showed tickets of the workitem type matching the Viewing form.&#x20;
* Fix for 'Share this ticket' by email. Previously, shared tickets would not work when clicking the email link, or receiving notifications.&#x20;
* Fix for Claims and Error pages on custom domain with SSO. Previously, would show signup button.

### 2025.06.20

This is a minor release. Changes include:

* SSO: Fix for direct link to tickets while not signed in. Previously, would redirect user to non-SSO signin flow.
* Custom domain: Removed Back buttons where they were redundant
* Show all tickets screen: No longer restricted by ADO workitem type. Now shows all available tickets.
* Notification settings: Minor changes to UI layout and behavior

### 2025.06.13

This is a major release. See full release note here: [2025.06.13: Notification settings](/release-notes/2025.06.13-notification-settings)

Changes include:

* Notification Settings added to Service Desk Settings.
* Custom domain: Fix for "Join Service Desk" button. Previously, this showed a 'service desk is missing' error.
* Sign Up / Sign In: Fixes to show/hide the 'Sign Up' and 'Sign In' buttons on several screens.
* Settings: Indicator on Customization screen if SSO is enabled for a service desk.

### 2025.06.09

This is a major release. See full release notes here: [2025.06.09: Landing page](/release-notes/2025.06.09-landing-page)

Changes include:

* Landing pages now support rich text.
* User settings page now shows 'last seen' date.
* Change to image zoom behavior.
* Sign up button removed for custom domains with SSO.

### 2025.05.21

This is a major release. See full release notes here: [2025.05.21: Single Sign On (SSO)](/release-notes/2025.05.21-single-sign-on-sso)

Changes include:

* Support for Single Sign On (SSO) with Microsoft Entra on custom domains

### 2025.04.30

This is a major release. See full release notes here: [2025.04.30: Sharing a ticket](/release-notes/2025.04.30-sharing-a-ticket)

Changes include:

* Added Share Tickets feature to allow easy sharing with other users.
* Added View Watchers screen so users can see which other users are currently watching a ticket.
* Notification emails can now contain details of the changes made to the ticket.

## 2024 and earlier

### 2024.11.07

See full release notes here: [2024.11.07: Parameter values](/release-notes/2024.11.07-parameter-values)

Changes include:

* New feature to allow custom fields to be set with TicketLog parameter values.

### 2024.06.21

This update applies only to the Marketplace extension.

See full release notes here: [2024.06.21: Extension upate](/release-notes/2024.06.21-extension-upate)

Changes include:

* The extension page has been moved to the **Project Settings** > **Extensions** section.
* The TicketLog page has been removed from the navigation sidebar.
* The Create Service Desk button is only visible if you are a Project Administrator.
* An Authorize button has been added next to each connected service desk.

### 2024.06.10

See full release notes here: [2024.06.10: Multi-forms](/release-notes/2024.06.10-multi-forms)

Changes include:

* Added Multi-forms feature
* Configuration settings have moved from General to Azure DevOps pages to the new Form & Fields page.

### 2024.06.06

See full release notes here: [2024.06.06: Remove ticket](/release-notes/2024.06.06-remove-ticket)

Changes include:

* Updated behaviour when encountering a deleted ticket in Azure DevOps
* Added a feature to allow Users and Administrators to remove tickets

### 2024.05.09

See full release notes here: [2024.05.09: Accepted domains](/release-notes/2024.05.09-accepted-domains)

Changes include:

* Added option to specify accepted email address domains for new users
* Moved the 'invited users only' option to the User Settings section

## 2023

### 2023.12.09

See full release notes here: [2023.12.09: Timezones](/release-notes/2023.12.09-timezones)

Changes include:

* Added option to specify a service desk time zone, which is applied to all dates and times (previously, dates and times were always presented in UTC)

### 2023.11.02

See full release notes here: [2023.11.02: Custom fields](/release-notes/2023.11.02-custom-fields)

Changes include:

* Service Desks can now prompt users with custom fields on new tickets


# 2026.07.09: Notification filter

Changes in this release:

* Ability to filter notification emails by ticket state.
* Added link to Stripe billing portal to change Payment Method
* Fix for file attachments with unusual characters in filename

## Filter notification email by ticket state

Administrators can now configure notifications to be filtered by state. If an update occurs when that ticket is not in a specified state, a notification will not be sent.

By default, no filter is applied and all notifications are sent.

A separate filter can be specified for regular users and for Admin/Moderators.

To configure this setting, visit: **Settings** > **Customization** > **Notification Settings**.

<figure><img src="https://2014854803-files.gitbook.io/~/files/v0/b/gitbook-x-prod.appspot.com/o/spaces%2FxDo3MABoirR9g57aZyJ1%2Fuploads%2FJz0THYalsvvI7KNjPQRG%2Fimage.png?alt=media&amp;token=20e8f493-f501-4870-8a87-ce7dc0aeddb3" alt=""><figcaption></figcaption></figure>


# 2025.06.13: Notification settings

Today we released the ability for Administrators to customize your own email notification messages.

This release also addresses some issues with last week's release regarding Join Service Desk button and the Sign Up and Sign In buttons.

## Notification settings

To visit the Notification Settings screen, open the Customization page in service desk settings, scroll down and click the Notification Settings button.

<figure><img src="https://2014854803-files.gitbook.io/~/files/v0/b/gitbook-x-prod.appspot.com/o/spaces%2FxDo3MABoirR9g57aZyJ1%2Fuploads%2FnJnBClS204tsrkRJL9Im%2Fimage.png?alt=media&amp;token=7b9483dc-9844-4c61-a2bb-51c7dfddc9ba" alt="" width="563"><figcaption></figcaption></figure>

Once open, you can configure the following settings:

* Send 'created' email notiications to the original author when a ticket is created
* Include content details in all 'created' and 'updated' notifications
* Ticket 'created' email notification contents
* User 'invite' email notification contents
  * In this template, you can use two paramaters:
    * {deskname} - automatically adds the name of the desk
    * {deskurl} - automatically adds the url to the desk as a hyperlink

<figure><img src="https://2014854803-files.gitbook.io/~/files/v0/b/gitbook-x-prod.appspot.com/o/spaces%2FxDo3MABoirR9g57aZyJ1%2Fuploads%2F2yoSJaZDPLBdmeQ9kX9m%2Fimage.png?alt=media&amp;token=b9e4c0bd-904b-4257-9316-271e34cd2fcb" alt="" width="563"><figcaption><p>Notification settings screen</p></figcaption></figure>

## Other changes

Also in this release are:

* Fix for "Join Service Desk" button on custom domain. Previously, this showed a 'service desk is missing' error.
* Fixes to show/hide the 'Sign Up' and 'Sign In' buttons on several screens.
* Indicator on Customization screen if SSO is enabled for a service desk.


# 2025.06.09: Landing page

This release adds a few small improvements to TicketLog that were requested by our wonderful users:

* Landing page changes:
  * Service desk Introduction can now be rich text
  * Service desk Introduction can now be optionally hidden from non-users
  * Service desk form options will no longer appear to non-users
* User settings page now shows Last Seen date
* Users can now zoom images with a single click

Please send us feedback with any comments you have for the above new features.

## Changes to service desk landing page

On the service desk settings screen, the service desk *Introduction text* field now allows rich formatting of your text:

<figure><img src="https://2014854803-files.gitbook.io/~/files/v0/b/gitbook-x-prod.appspot.com/o/spaces%2FxDo3MABoirR9g57aZyJ1%2Fuploads%2FJx3Rl7Y8fpejMVp77LJ4%2Fimage.png?alt=media&amp;token=c3dedcc6-09b0-4acb-83ea-7b09f17809fd" alt="" width="563"><figcaption></figcaption></figure>

<figure><img src="https://2014854803-files.gitbook.io/~/files/v0/b/gitbook-x-prod.appspot.com/o/spaces%2FxDo3MABoirR9g57aZyJ1%2Fuploads%2FR2PqMgsm4rlfgSmmAd7d%2Fimage.png?alt=media&amp;token=24744236-a050-4a86-8083-09b6e6dddb9a" alt="" width="563"><figcaption></figcaption></figure>

Also, you can now hide the *Introduction text* from visitors that are not logged in or do not have access to your service desk, by disabling this setting:

<figure><img src="https://2014854803-files.gitbook.io/~/files/v0/b/gitbook-x-prod.appspot.com/o/spaces%2FxDo3MABoirR9g57aZyJ1%2Fuploads%2FmYEPcExfMaKOuLtS820b%2Fimage.png?alt=media&amp;token=1cb6266f-ff68-416f-8cf0-9f86c1478d2c" alt="" width="563"><figcaption></figcaption></figure>

Finally, TicketLog will now hide all form options if the signed-in user is not permitted to submit a ticket (previously, this block occurred only after clicking New Ticket):

<figure><img src="https://2014854803-files.gitbook.io/~/files/v0/b/gitbook-x-prod.appspot.com/o/spaces%2FxDo3MABoirR9g57aZyJ1%2Fuploads%2FDmebWibkGMY92KkkEVDc%2Fimage.png?alt=media&amp;token=3560352d-f42d-498f-bc8e-88287dc4ffb1" alt="" width="563"><figcaption></figcaption></figure>

## Changes to user settings page

Administrators can now see the last time each user was seen on the TicketLog platform:

<figure><img src="https://2014854803-files.gitbook.io/~/files/v0/b/gitbook-x-prod.appspot.com/o/spaces%2FxDo3MABoirR9g57aZyJ1%2Fuploads%2FOMxJ0AjhxGMe7koDOqvG%2Fimage.png?alt=media&amp;token=eb407161-ba43-44d4-b834-584a7d745470" alt="" width="563"><figcaption></figcaption></figure>

The list of users now allows sorting by Email address, Permission or Last Seen date. Click on the heading of each column to toggle the sorting mode.

## Other changes

* Users can now expand an image to appear full screen by clicking on it. Click again to shrink the image.
* Removed 'Sign Up' button on custom domain when SSO or Invite Only is enabled.
* Fixes to 'Signed Out' page.


# 2025.05.21: Single Sign On (SSO)

In this release, we added support for Single Sign On.

* Only available on Pro service desks with [custom domain setup](/documentation/administrators-guide/custom-domain)
* Only available for Microsoft Entra ID as your identity provider (Idp)

If you would like SSO enabled for your organization's service desk, please contact TicketLog support.

For detailed instructions visit the Administrators guide on [Single Sign On (SSO)](/documentation/administrators-guide/single-sign-on-sso).

**Other changes:**

* Updated all Sign Up and Sign In pages to the latest version provided by Microsoft.


# 2025.04.30: Sharing a ticket

Today we released new features to simplify sharing of tickets with other users.

This release also adds a screen to view the active watchers of a ticket. Ticket watchers are users who receive notifications when changes are applied to the ticket.

These new features are only available to Moderators and Administrators.

{% hint style="info" %}
**Update 30/6/2025:** 'Share this ticket' is now available to all users. Previously, it was only available to Moderators and Administrators.
{% endhint %}

## Share this ticket&#x20;

When viewing a ticket, users now have the ability to 'Share this ticket'. This option is available in the top-right ticket menu:

<figure><img src="https://2014854803-files.gitbook.io/~/files/v0/b/gitbook-x-prod.appspot.com/o/spaces%2FxDo3MABoirR9g57aZyJ1%2Fuploads%2FVZ18nJxepQDXtWxoND2E%2Fimage.png?alt=media&amp;token=957b7ffa-627a-425b-b4e5-5ad3aeec105c" alt="" width="197"><figcaption></figcaption></figure>

From this screen users have two methods to share a ticket with another user: 'Share by email' and 'Share by link'.

<figure><img src="https://2014854803-files.gitbook.io/~/files/v0/b/gitbook-x-prod.appspot.com/o/spaces%2FxDo3MABoirR9g57aZyJ1%2Fuploads%2FW1nkJ1UlGt7fmQW3weQv%2Fimage.png?alt=media&amp;token=b177dd2d-34e9-4762-b781-5885554116d2" alt="" width="375"><figcaption></figcaption></figure>

### Share by email

Choose this option to send a ticket link to a specified email address. Enter the email address and click 'Send email'. The recipient will receive an email with a link to the ticket.

The recipient will be added to the ticket as a watcher. However, if the recipient is not a member of the service desk, they will not receive notification emails until they are.

### Share by link

Click 'Copy link' to copy a ticket link to the clipboard. You can then paste the link to another application. For example, you might paste this into a chat application or email.

## Show watchers

When viewing a ticket, Moderators and Administrators now have the ability to 'Show watchers':

<figure><img src="https://2014854803-files.gitbook.io/~/files/v0/b/gitbook-x-prod.appspot.com/o/spaces%2FxDo3MABoirR9g57aZyJ1%2Fuploads%2FHoTihXkwbpo4vlf6zEUh%2Fimage.png?alt=media&amp;token=c101cfb7-6a64-4f3d-82ab-c2c18ba794d2" alt="" width="197"><figcaption></figcaption></figure>

From this screen you can see all users who are watchers of the ticket. Watchers are users who will receive a notification when changes to the ticket are made in Azure DevOps, such as a new comment or change in status.

<figure><img src="https://2014854803-files.gitbook.io/~/files/v0/b/gitbook-x-prod.appspot.com/o/spaces%2FxDo3MABoirR9g57aZyJ1%2Fuploads%2FFh9SCfCXuR87qS9u8exr%2Fimage.png?alt=media&amp;token=e1553817-d17f-4f93-9484-365e58c9fde7" alt="" width="375"><figcaption></figcaption></figure>

## More changes

Also in this release, the following change(s) were made:

* Notification emails can now contain details of the changes made to the ticket:

<figure><img src="https://2014854803-files.gitbook.io/~/files/v0/b/gitbook-x-prod.appspot.com/o/spaces%2FxDo3MABoirR9g57aZyJ1%2Fuploads%2FZh1Bz7kj5r4uv4gNTGDP%2Fimage.png?alt=media&amp;token=b1c561cc-0663-484a-9b65-ebb90571825c" alt="" width="563"><figcaption></figcaption></figure>

* Note: This feature is only available upon request. Please [contact us](https://ticket-log.com/contact-us) to enable this behaviour on your service desk.


# 2024.11.07: Parameter values

In this release we have a new feature to allow custom fields be set to TicketLog parameter values.

* **Ticket URL** - the URL of the ticket once it's created
* **User email** - the email address of the user creating the ticket
* **Username** - the name of the user creating the ticket

<figure><img src="https://2014854803-files.gitbook.io/~/files/v0/b/gitbook-x-prod.appspot.com/o/spaces%2FxDo3MABoirR9g57aZyJ1%2Fuploads%2FeiVoSdXit2fa4SLjgxp7%2Fimage.png?alt=media&amp;token=f845c818-3e62-462f-a318-d278301bc314" alt="" width="563"><figcaption></figcaption></figure>

For the latest information on this feature, refer to the [Forms & fields](/documentation/administrators-guide/forms-and-fields#parameter-values) documentation page.


# 2024.06.21: Extension upate

Today we have updated the Azure DevOps marketplace extension.

The following changes have been applied to the extension:

1. The extension page has been moved to the **Project Settings** > **Extensions** section. We have removed the TicketLog page from the navigation sidebar.
2. The Create Service Desk button is only visible if you are a Project Administrator.
3. We have added an Authorize button next to each connected service desk. Clicking this will trigger the service desk's authorization flow against the currently signed in ADO user. This makes it more convenient to change the Integration user, as you can see the current user in the top panel prior to authorization.

<figure><img src="https://2014854803-files.gitbook.io/~/files/v0/b/gitbook-x-prod.appspot.com/o/spaces%2FxDo3MABoirR9g57aZyJ1%2Fuploads%2FiqJ3g2S9Azrcx90vK0xi%2Fimage.png?alt=media&amp;token=13c74a33-c7a7-4e58-b2a9-67ec316e0b25" alt=""><figcaption></figcaption></figure>

For more information on the ADO marketplace extension, see [Azure DevOps extension](/documentation/azure-devops-extension).


# 2024.06.10: Multi-forms

Today we have a major release for an exciting new feature: **Multi-forms**!

{% hint style="info" %}
For the latest information on multi-forms, refer to [Forms & fields](/documentation/administrators-guide/forms-and-fields).
{% endhint %}

With multi-forms, you can prompt users to choose from multiple submission forms for new tickets, with each form having different custom fields and Azure DevOps configuration.

<figure><img src="https://2014854803-files.gitbook.io/~/files/v0/b/gitbook-x-prod.appspot.com/o/spaces%2FxDo3MABoirR9g57aZyJ1%2Fuploads%2FgSIu0PF7CQknHef7VI4V%2Fimage.png?alt=media&amp;token=f8c79a90-107e-4f6b-88b3-1e43353adc12" alt="" width="514"><figcaption></figcaption></figure>

Also in this release, some configuration settings have moved from General and Azure DevOps pages to the new Form & Fields page.

## Changes to existing settings

This release has renamed the Fields page to Form & Fields, and some settings have been moved to this page.

The following setting has moved from the General page to Form & Fields page:

* **New Ticket template**

<figure><img src="https://2014854803-files.gitbook.io/~/files/v0/b/gitbook-x-prod.appspot.com/o/spaces%2FxDo3MABoirR9g57aZyJ1%2Fuploads%2FyOc9t3Kec1ZjGdW825q1%2Fimage.png?alt=media&amp;token=68ee2119-b8c1-4ae3-bb2e-ea3d0d2a93fb" alt=""><figcaption></figcaption></figure>

The following settings have moved from the Azure DevOps page to Form & Fields page:

* **Work Item Type**
* **Tag**
* **Area Path**

<figure><img src="https://2014854803-files.gitbook.io/~/files/v0/b/gitbook-x-prod.appspot.com/o/spaces%2FxDo3MABoirR9g57aZyJ1%2Fuploads%2F3jr1YJmghF3a7qtgwohF%2Fimage.png?alt=media&amp;token=7a607bf0-4492-490a-af1c-f8397e3d10a7" alt=""><figcaption></figcaption></figure>

## New settings

The following settings have been added to Form & Fields:

* **Name** - this sets the title text that appears on the Service Desk screen before the "New Ticket" button. This field is optional.
* **Description** - this sets the text that appears on the Service Desk screen before the "New Ticket" button. This field is optional.
  * Default value: *To log a new service request, click New Ticket.*

When the Form & Fields page is saved, TicketLog will check the Azure DevOps connection is valid for the new settings. Results will appear in the Connection section at the end of the page, and will include warnings about missing required fields or other errors.

<figure><img src="https://2014854803-files.gitbook.io/~/files/v0/b/gitbook-x-prod.appspot.com/o/spaces%2FxDo3MABoirR9g57aZyJ1%2Fuploads%2FBcD98hNhEPjWAFj6YLFi%2Fimage.png?alt=media&amp;token=766c9a2f-7811-467a-8d7f-aa8627b07108" alt=""><figcaption></figcaption></figure>

## Multi-forms

{% hint style="warning" %}
**For the latest information regarding multi-forms, refer to the** [Forms & fields](/documentation/administrators-guide/forms-and-fields) **documentation page.**
{% endhint %}

With multi-forms you can specify multiple forms for users to choose from when submitting a new ticket.

<figure><img src="https://2014854803-files.gitbook.io/~/files/v0/b/gitbook-x-prod.appspot.com/o/spaces%2FxDo3MABoirR9g57aZyJ1%2Fuploads%2Fe179ujYuI8M7JkRntCdL%2Fimage.png?alt=media&amp;token=cc019c60-67ee-4ccc-9db6-f8b118d72505" alt=""><figcaption></figcaption></figure>

Each form can specify these configuration settings:

* Name
* Description
* New ticket template
* Azure DevOps work item settings:
  * Work Item Type
  * Tag
  * Area Path
* Form fields

<figure><img src="https://2014854803-files.gitbook.io/~/files/v0/b/gitbook-x-prod.appspot.com/o/spaces%2FxDo3MABoirR9g57aZyJ1%2Fuploads%2FAM7qcJG3oVvxBzHpqFF7%2Fimage.png?alt=media&amp;token=8a680428-b594-4836-95ca-eab4e968d121" alt=""><figcaption></figcaption></figure>

<figure><img src="https://2014854803-files.gitbook.io/~/files/v0/b/gitbook-x-prod.appspot.com/o/spaces%2FxDo3MABoirR9g57aZyJ1%2Fuploads%2Fr4CyZSnq78zRUxIRolMp%2Fimage.png?alt=media&amp;token=cd0f5c3d-49e4-4c48-bdfe-beef2b04ab56" alt=""><figcaption></figcaption></figure>

<figure><img src="https://2014854803-files.gitbook.io/~/files/v0/b/gitbook-x-prod.appspot.com/o/spaces%2FxDo3MABoirR9g57aZyJ1%2Fuploads%2F6FLbM3rwerZgDQuPrt1V%2Fimage.png?alt=media&amp;token=414aea0e-526d-45c9-857c-5586043c80c6" alt=""><figcaption></figcaption></figure>

The following conditions apply to multi-forms:

* All forms must connect to the same Azure DevOps organization and project.
* You can add and delete multiple forms, but must have at least one form.
* One form must be designated as the *viewing form*. This form is always used to display the contents of a ticket, regardless of which form was used to create the ticket. It must therefore include all relevant fields for your users.

## Post-release notes

### Update Releases

#### 2024.06.14

* **New:** Support for multi-line/html fields
* Refresh styling of Forms & Fields Settings page (screenshots above have been updated)
* Improve handling of large images that overflow in ticket comments and fields
* Remove hyperlink from '# links' in ADO comments
* Hide My Tickets for logged in users who are not a service desk member
* Hide Pro Upgrade button from non-admin users in My Service Desks page
* Fixed: Unexpected redirect on New Ticket when using multi-form on custom domain
* Fixed: Loss of Description field contents when New Ticket submission fails

#### 2024.06.21

* **New:** Support for changing the display order of form fields
* Fixed: Check Connection now validates all forms, not just the Viewing form.


# 2024.06.06: Remove ticket

A minor release today to resolve an issue with deleted work items in Azure DevOps.

Previously, if a work item was deleted in Azure DevOps, the ticket would continue to appear in TicketLog.

With this release, we have added the option to remove tickets from your list, and everyone's list if you are an Administrator.

## Remove Ticket via My Tickets section

To remove a ticket from My Tickets section, perform the following steps:

* In My Tickets section, find the ticket you would like to remove
* Click the context menu and select Archive Ticket
* Click Show Archived Tickets

<figure><img src="https://2014854803-files.gitbook.io/~/files/v0/b/gitbook-x-prod.appspot.com/o/spaces%2FxDo3MABoirR9g57aZyJ1%2Fuploads%2FXgAzigJGW7PEJObwV04h%2Fimage.png?alt=media&amp;token=8d9ab92f-ce0a-4651-a027-9f41fc4303e0" alt=""><figcaption></figcaption></figure>

* Find the ticket again, open the context menu and select Remove Ticket

<figure><img src="https://2014854803-files.gitbook.io/~/files/v0/b/gitbook-x-prod.appspot.com/o/spaces%2FxDo3MABoirR9g57aZyJ1%2Fuploads%2FTXNPdTKCHzrkME7mXiIR%2Fimage.png?alt=media&amp;token=843751eb-a707-4510-a11e-e7d50def903f" alt=""><figcaption></figcaption></figure>

* Click Remove in the confirmation box

This procedure only removes the ticket from your personal My Tickets list. If the ticket exists in the list of other users, it will remain there.

## Remove Ticket via Missing Ticket screen

As an Administrator, you can remove a ticket for all users with this approach.

If you visit the Ticket Details screen and it has been removed from Azure DevOps, you will face the following error message:

<figure><img src="https://2014854803-files.gitbook.io/~/files/v0/b/gitbook-x-prod.appspot.com/o/spaces%2FxDo3MABoirR9g57aZyJ1%2Fuploads%2FjgF1GeZUYAgPPKBpWPTh%2Fimage.png?alt=media&amp;token=c8f46a00-562e-4cf3-aba9-2c908e48d4bf" alt=""><figcaption></figcaption></figure>

* Click Remove ticket from TicketLog button. This will open a confirmation box.&#x20;

<figure><img src="https://2014854803-files.gitbook.io/~/files/v0/b/gitbook-x-prod.appspot.com/o/spaces%2FxDo3MABoirR9g57aZyJ1%2Fuploads%2FsRK7OHkUtUpkNp3qmFcY%2Fimage.png?alt=media&amp;token=a2cb1fba-6376-4d4a-87e7-648873ca1162" alt=""><figcaption></figcaption></figure>

* If you are an Administrator, you will have an additional option to remove the ticket for all TicketLog users.
  * If you select this option, then the ticket will be removed from My Tickets list for all TicketLog users.&#x20;
  * If you do not select this option, or you are not an Administrator, then this process will remove the ticket only from your My Tickets list.
* Click Remove in the confirmation box.&#x20;


# 2024.05.09: Accepted domains

Today's release introduces **accepted domains** for new users.

{% hint style="info" %}
For the latest information on Accepted Domains, refer to the [#specify-accepted-domains](#specify-accepted-domains "mention") documentation page.
{% endhint %}

Previously, users with any email address could be added to your service desk. Now, you can specify which domain a user's email address must belong to. This gives greater control on public service desks. For example, you can restrict users to people in your organisation.

Also in this release, we have moved the 'invited users only' option to the User Settings section.

<figure><img src="https://2014854803-files.gitbook.io/~/files/v0/b/gitbook-x-prod.appspot.com/o/spaces%2FxDo3MABoirR9g57aZyJ1%2Fuploads%2FMXYh3nLgk167y7B4dlzi%2Fimage.png?alt=media&amp;token=492c62b2-1aac-482d-934e-33b6a885346d" alt=""><figcaption></figcaption></figure>

## Specify Accepted Domains

To specify one or more accepted domain for new users:

* Visit **Settings** > **Users**.
* Enter a domain into the **Accepted Domain(s)** field. You can specify multiple domains by separating them with a semi-colon (;).
* Click **Save**.

Now, when a user attempts to create a ticket on your service desk with an email address that is not accepted, the user will face an error message:

<figure><img src="https://2014854803-files.gitbook.io/~/files/v0/b/gitbook-x-prod.appspot.com/o/spaces%2FxDo3MABoirR9g57aZyJ1%2Fuploads%2FPOkCAuUh0nbHk4n3zsAM%2Fimage.png?alt=media&amp;token=74df4c74-cf9f-44cc-bba8-2e15951c344c" alt=""><figcaption></figcaption></figure>

Notes:

* If your service desk is configured to 'invitation only', the restriction still applies.
* Only new users are restricted. Existing users with an unaccepted domain will continue to have access.


# 2023.12.09: Timezones

Today's release introduces improved support for **timezones**.

Previously, all dates and times were presented in UTC time. Now, you can choose your own timezone!

<div data-full-width="false"><figure><img src="https://2014854803-files.gitbook.io/~/files/v0/b/gitbook-x-prod.appspot.com/o/spaces%2FxDo3MABoirR9g57aZyJ1%2Fuploads%2FMSruNFcwaY1whEmes60m%2Fimage.png?alt=media&amp;token=ba5f3023-b24e-46ea-821c-25f95727fe91" alt=""><figcaption></figcaption></figure></div>

If any questions or concerns please let us know!

*TicketLog Team*

## Select a Different Timezone

To select a different timezone:

* Visit **Settings** > **General**
* Scroll down to Timezone and select your timezone.
* Click Save.

The selected timezone is applied to all users of your service desk.


# 2023.11.02: Custom fields

Today we released a major update to TicketLog: **Custom Fields!**

{% hint style="info" %}
For the latest information regarding custom fields, refer to the [Forms & fields](/documentation/administrators-guide/forms-and-fields#form-fields) documention page.
{% endhint %}

Service Desks can now prompt users with custom fields on new tickets:

<figure><img src="https://2014854803-files.gitbook.io/~/files/v0/b/gitbook-x-prod.appspot.com/o/spaces%2FxDo3MABoirR9g57aZyJ1%2Fuploads%2FozSvI4Lul53FTII9hl9D%2Fimage.png?alt=media&amp;token=ae7cadee-f7c2-4d60-8f0c-2551463d921e" alt="" width="437"><figcaption></figcaption></figure>

The user's responses to custom field prompts are added to the created Azure DevOps workitems.

Full details on how Custom Fields work are below, but a few notes on Custom Fields:

* Custom fields are only available to TicketLog PRO subscribers.
* Custom fields must first be created in your Azure DevOps Process Template before they are available in TicketLog. See below for instructions on [adding custom fields to Azure DevOps](#add-custom-field-in-azure-devops).
* The *Identity* custom field type is not supported.&#x20;

We hope you like it!&#x20;

If have any issues configuring your custom fields please let us know and we will be happy to help.

*TicketLog Team.*

## Configure a Custom Field

To add a custom field to TicketLog, navigate to the Service Desk's Settings screen, and click **Fields**. Then click **Configure Custom Fields**:

<figure><img src="https://2014854803-files.gitbook.io/~/files/v0/b/gitbook-x-prod.appspot.com/o/spaces%2FxDo3MABoirR9g57aZyJ1%2Fuploads%2FvVJQfgtD3dm0MeDVAq04%2Fimage.png?alt=media&amp;token=a21d9389-ab4b-4588-81f5-0932eb7a708d" alt="" width="438"><figcaption></figcaption></figure>

Wait for the available custom fields to load, select the fields you would like to include, then click **Update**:

<figure><img src="https://2014854803-files.gitbook.io/~/files/v0/b/gitbook-x-prod.appspot.com/o/spaces%2FxDo3MABoirR9g57aZyJ1%2Fuploads%2Fa9a5yN7RGwWOoWeukod5%2Fimage.png?alt=media&amp;token=d249c42b-a8bc-4dd9-9b74-4a81bd042e85" alt="" width="478"><figcaption></figcaption></figure>

You should now see the selected fields in the Settings screen:

<figure><img src="https://2014854803-files.gitbook.io/~/files/v0/b/gitbook-x-prod.appspot.com/o/spaces%2FxDo3MABoirR9g57aZyJ1%2Fuploads%2FRPGc505ZvuCzcLS2BhJQ%2Fimage.png?alt=media&amp;token=e72d1de6-872d-45dc-bc6c-b527df116aab" alt="" width="445"><figcaption></figcaption></figure>

## New Ticket with Custom Field

When a new ticket is created, the user can now enter a value for the custom field:

<figure><img src="https://2014854803-files.gitbook.io/~/files/v0/b/gitbook-x-prod.appspot.com/o/spaces%2FxDo3MABoirR9g57aZyJ1%2Fuploads%2FnKuBwSq5lZ2QmkQPmpk1%2Fimage.png?alt=media&amp;token=cb9791c1-7b8e-4d94-93cf-3a33e9baf27c" alt=""><figcaption></figcaption></figure>

The field value will appear at the top of the ticket details screen:

<figure><img src="https://2014854803-files.gitbook.io/~/files/v0/b/gitbook-x-prod.appspot.com/o/spaces%2FxDo3MABoirR9g57aZyJ1%2Fuploads%2FtFTtT9xARTCk8F1aNz4F%2Fimage.png?alt=media&amp;token=ae31fccf-0816-4061-ae1b-924bc925189d" alt="" width="437"><figcaption></figcaption></figure>

The field will also appear in the Azure DevOps workitem detail screen:

<figure><img src="https://2014854803-files.gitbook.io/~/files/v0/b/gitbook-x-prod.appspot.com/o/spaces%2FxDo3MABoirR9g57aZyJ1%2Fuploads%2FPVvebBvFt0dEsrDX2bWE%2Fimage.png?alt=media&amp;token=0bf96ec0-a1f2-489a-b704-e0940fcebe56" alt="" width="563"><figcaption></figcaption></figure>

## Add Custom Field in Azure DevOps

Only custom fields added to your Azure DevOps process Template are available in TicketLog.

To add a field to your ADO Process Template:&#x20;

1. In Azure DevOps, visit **Organization Settings** > **Process**
2. Find the process used by your project. If not already done, create an Inherited Template and move your project to the inherited template. Only inherited templates can have custom fields.
3. Select the inherited template.
4. Select a work item type. TicketLog defaults to the "Issue" work item type, but other types are supported (see [Authorizing Azure DevOps](/troubleshooting/authorizing-azure-devops)).
5. Click "New field" and complete the details for a new custom field.

<figure><img src="https://2014854803-files.gitbook.io/~/files/v0/b/gitbook-x-prod.appspot.com/o/spaces%2FxDo3MABoirR9g57aZyJ1%2Fuploads%2F138fE88OTRHzemBINI4b%2Fimage.png?alt=media&amp;token=70e8bf77-ee49-451e-9a5f-ee9cf8499e61" alt=""><figcaption></figcaption></figure>


# Assets

This page hosts assets you can use to represent TicketLog where required.

#### Icons

<figure><img src="https://2014854803-files.gitbook.io/~/files/v0/b/gitbook-x-prod.appspot.com/o/spaces%2FxDo3MABoirR9g57aZyJ1%2Fuploads%2FYKqu1XyBBpJM4Cdoadhz%2Fimage.png?alt=media&amp;token=9c8a4a7d-20e3-4c46-ad88-7d025cdeb2d7" alt="" width="375"><figcaption></figcaption></figure>

#### Logos

<figure><img src="https://2014854803-files.gitbook.io/~/files/v0/b/gitbook-x-prod.appspot.com/o/spaces%2FxDo3MABoirR9g57aZyJ1%2Fuploads%2FwMH8kriP7uzcAdITvACZ%2Fimage.png?alt=media&amp;token=040f7aba-fefe-4419-b2a2-0c916125beaa" alt="" width="375"><figcaption></figcaption></figure>